Take Card, Coin and Cash Payments
A QR code through your payment gateway is the default way a booth gets paid. This tutorial covers the other ways money comes in: a Stripe Terminal card reader, a coin or note acceptor, a Nayax, Ingenico or ePort card reader or a Transpire QR DuitNow terminal on a CASH-Interface2 board, your own bridge on the booth's local Hardware API, and cash taken by a person at the counter. Every setup ends the same way: the photo session is recorded as paid in Transactions, with the amount, not as a free session.
Allow about 30 minutes for a keystroke setup once the hardware is wired, longer if you build a bridge.
Before You Start
- Pix Pro on the booth computer. On Pix Starter the booth skips the Payment screen, so nothing can be charged.
- Pix Desktop App 1.1.87 or newer, so that hardware payments are recorded as revenue.
- The booth's Pricing tab set: Payment on this booth on and a Session price (see Booth Pricing). A cash system that starts the session records it at this price.
- The hardware wired to the booth computer and configured on its own side: coin values, the price, pulse or keystroke output. The CASH-Interface2 board needs its own 12 V supply; always unplug it before you connect an acceptor.
- A Stripe gateway if you use a Stripe Terminal reader; see Create a Payment Gateway.
- The booth pages in this tutorial have no screenshots; they are described in words.
Pick Your Setup
| You have | Setup | What the guest does |
|---|---|---|
| A Stripe account and a Stripe Terminal reader | A: Stripe Terminal | Taps or inserts a card on the reader at the booth |
| A coin or note acceptor, or a Nayax, Ingenico or ePort reader, on a CASH-Interface2 board, at one fixed price | B1: Start-gate (recommended) | Pays on the reader first; the booth starts by itself and never shows a price |
| The same hardware, but you sell packages and want the amount on screen | B2: Pay on the Payment screen | Picks a package on the booth, then pays on the reader; the reader confirms |
| A coin box with a USB keyboard adapter, or a CASH-Interface2 typing one key per coin | B3: Coins by keystroke | Feeds coins while the booth counts them on screen |
| A booth in Malaysia that should take DuitNow QR at the booth | B4: DuitNow QR terminal (Transpire QR), then B1 or B3 | Scans a QR on the terminal with any Malaysian bank or e-wallet app |
| A PLC, bridge box or terminal that can call a URL | C: Local Hardware API | Whatever your bridge does |
| A person at the counter taking cash | D: Voucher codes | Pays the cashier, gets a code, types it into the Voucher box |
Which one fits your business is covered in Payment Setups by Use Case.
The Payment Screen's Methods
Every setup except the start-gate goes through the booth's Payment screen, and what that screen offers is set in the UI Editor.
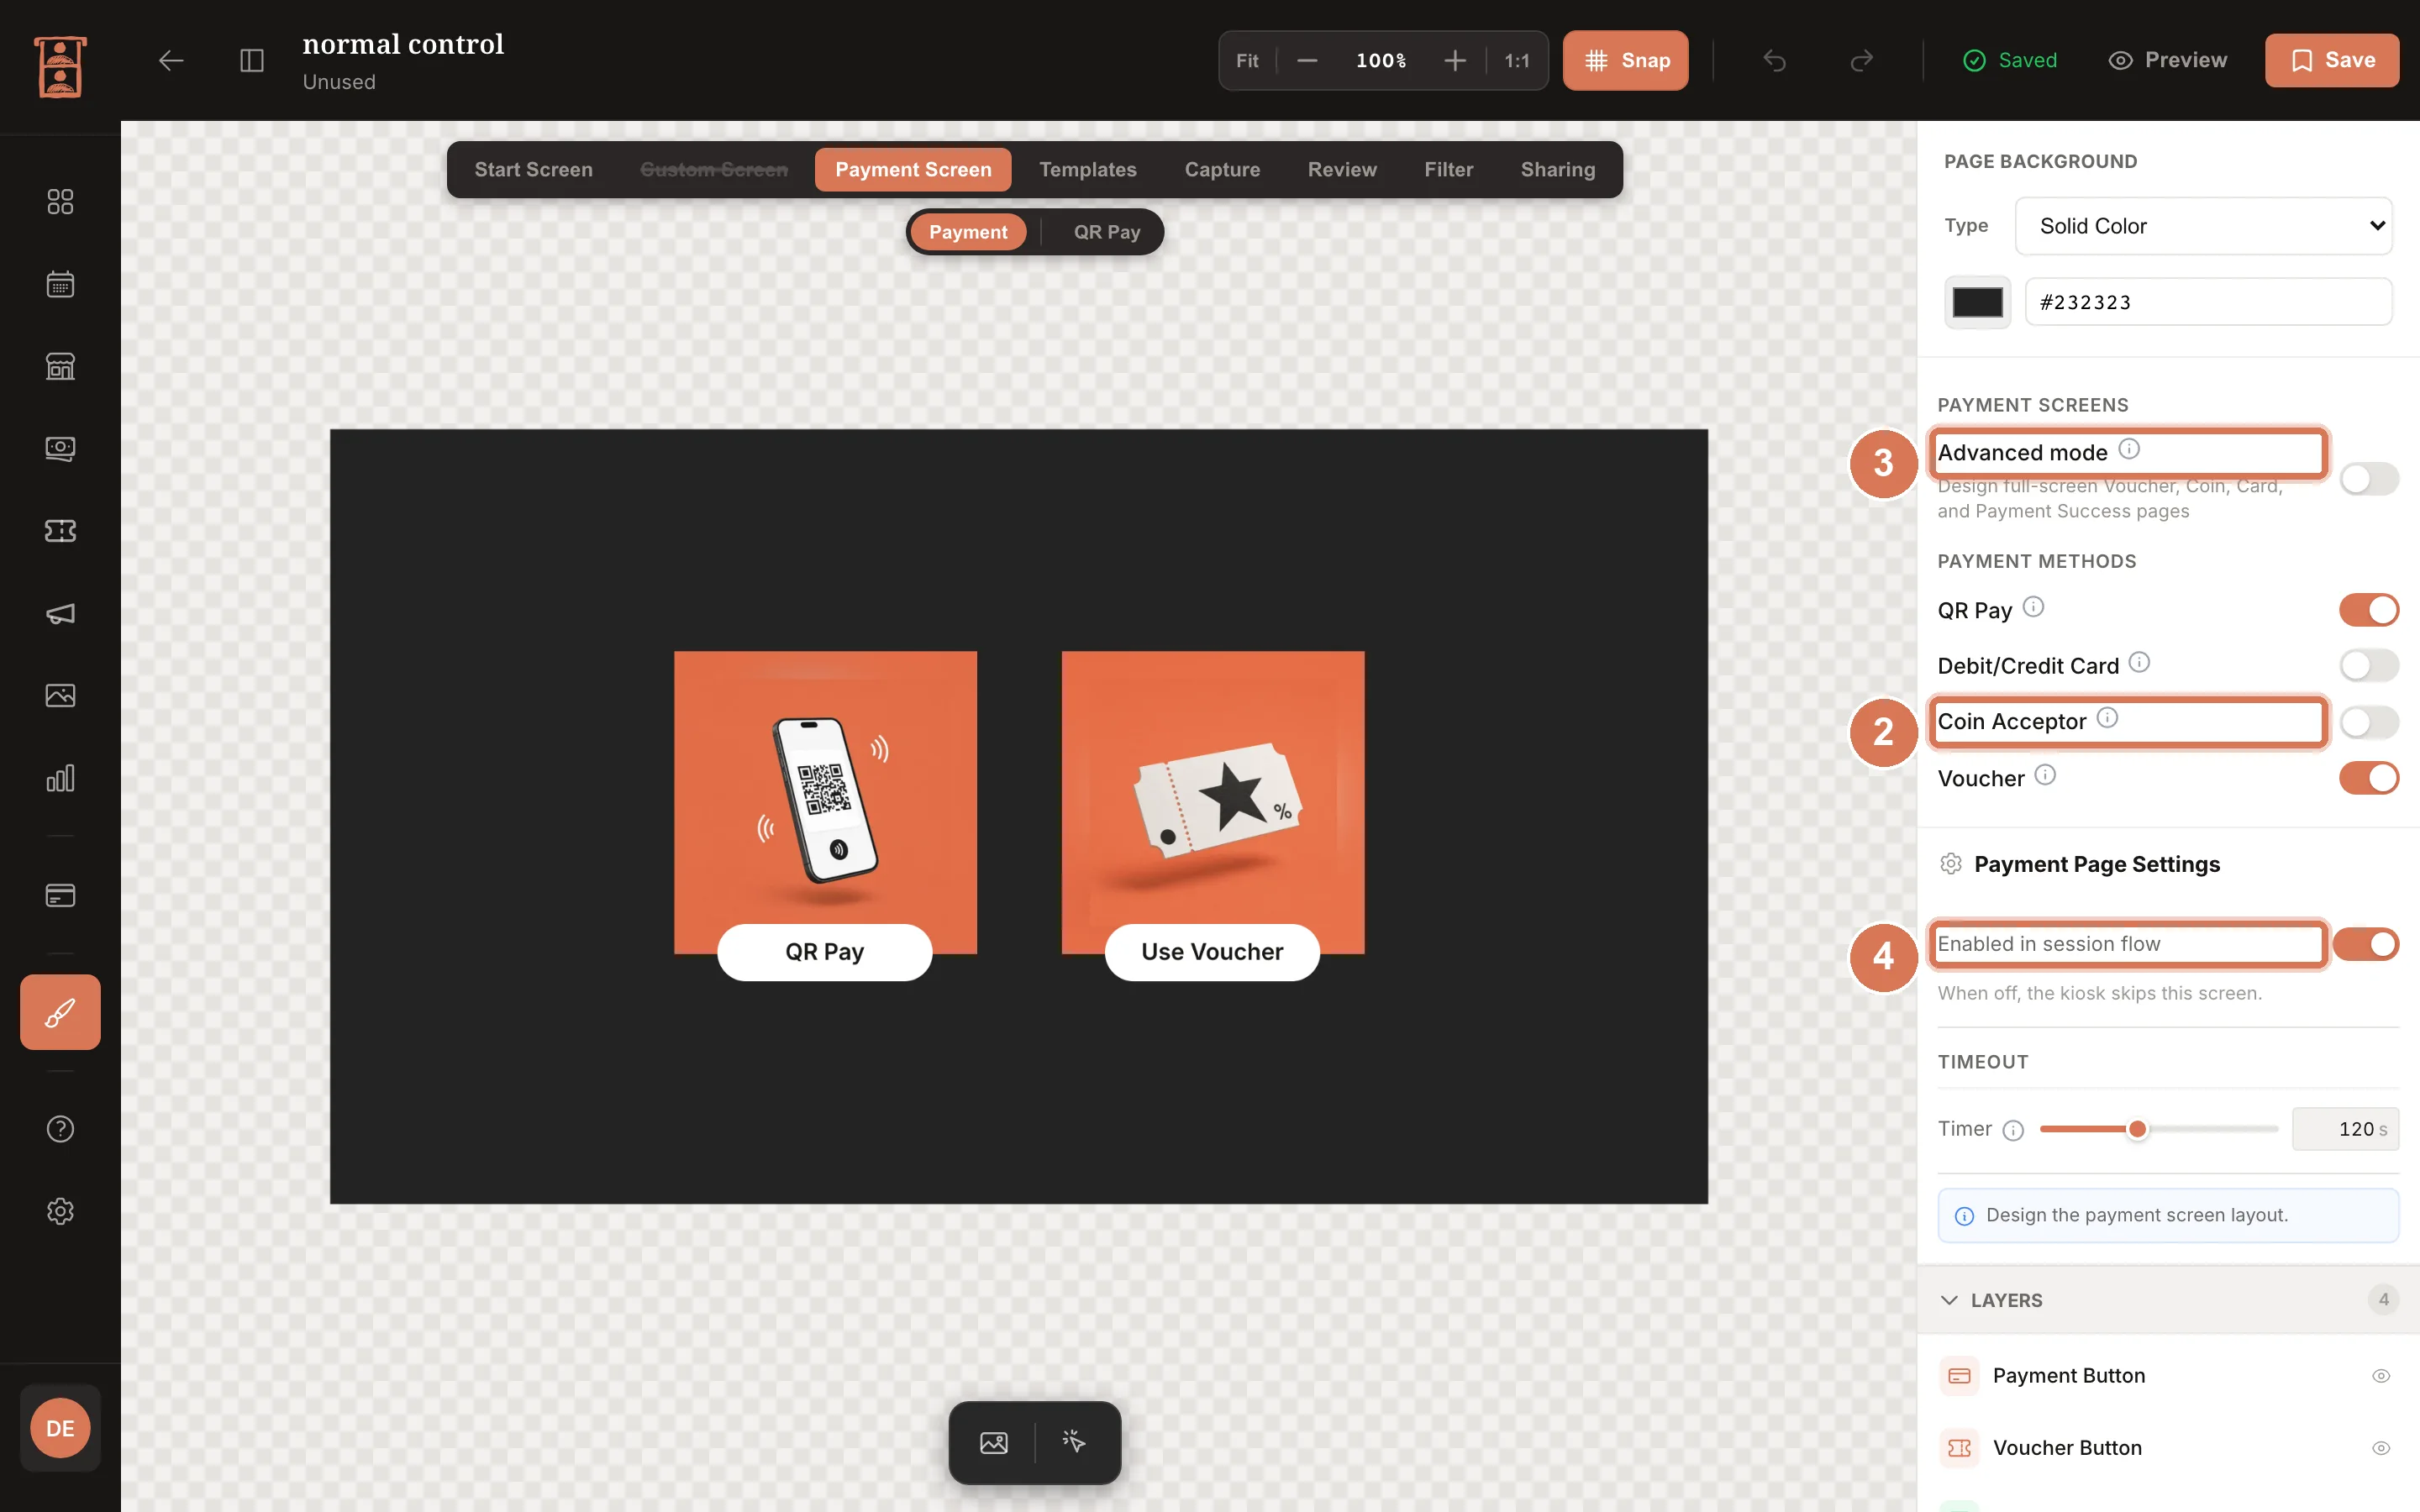
- Open Pix Design > UI Editor, open the booth's project and click the Payment Screen tab.
- Under Payment Methods, turn on the methods the booth takes: QR Pay (the gateway), Debit/Credit Card (a card reader: it shows a tap-to-pay popup until the reader confirms), Coin Acceptor (it shows an insert-coins popup until enough is in) and Voucher. The last method on cannot be turned off.
- Advanced mode turns those popups into full screens you design yourself, with a Payment Success page. Leave it off to keep the built-in popups.
- Enabled in session flow under Payment Page Settings is the switch the start-gate setup turns off. Save.
Setup A: A Stripe Terminal Card Reader
Guests tap or insert a card on a reader at the booth. The payment goes through your Stripe account, the same gateway that otherwise shows a Stripe QR code. Stripe works worldwide, so this is the card option outside Indonesia.
- Connect Stripe as in Create a Payment Gateway and run the test charge.
- Register the reader in the Stripe Dashboard under Terminal and connect it to the booth's Wi-Fi.
- On the Stripe gateway card under Settings > Payment Gateway, open Card readers (Stripe Terminal) and pick the reader in the booth's dropdown. It reads No reader (QR payment) until you do.
- In the UI Editor, turn on Debit/Credit Card under Payment Methods and Save.
- Start a session on the booth, tap the card method, and tap a card on the reader. The booth shows Payment Success once Stripe confirms.
Packages work with this setup: the reader charges whatever amount the guest picked on screen.
Before you buy a reader. Stripe sells its readers in the Stripe Dashboard under Terminal > Shop, and which models you can order depends on the country of your Stripe account. A reader charges only in that account's own currency: a Malaysian Stripe account charges MYR, a US account USD. A booth priced in another currency gets "Card reader payment could not be started" instead of the tap screen, so set the booth's currency to match the account.
What the guest sees.
- Approved card: the booth shows Payment Success a moment after the tap and the session starts.
- Declined card: the reader shows the decline and the booth keeps waiting. To retry, the guest cancels and chooses the card method again, which sends a fresh charge to the reader.
- Guest cancels: cancelling the payment on the booth clears the reader's tap screen and cancels the charge, so nothing can go through later.
The booth confirms a card payment by asking Stripe while its payment screen is open. If the booth is closed, restarted or loses power right after the tap, Stripe keeps the charge but no session is recorded. Find the payment in the Stripe Dashboard under Payments and refund it, or give the guest a voucher code.
Setup B: A CASH-Interface2 Cash System
A CASH-Interface2 (CI2) kit is a board plus its keystroke software. The board takes coin validators (NRI G13, RM5, EMP800 and pin-compatible), note validators (NV9, NV10) and, through its PULSE input or a PULSE adapter, cashless readers such as the Nayax ONYX, VPOS Touch and AMIT 3, Ingenico and ePort. Coins, notes and a card reader can all be on at once.
The software cannot call URLs. It presses a hotkey into the window whose title matches its "receiver name". The Pix Desktop App changes its window title per screen: Pix - START on the Start screen and Pix - PAYMENT on the Payment screen, so the cash system always knows where the booth is.
All three CI2 setups use the booth's Hardware API page: open the operator menu (tap the top-right corner twice within 3 seconds and enter the PIN if one is set), then Hardware API. Its CASH-Interface2 keystroke edition section shows the same setup tables as below, so you can copy values while you stand at the booth.
Setup B1: Start-gate (recommended)
The guest pays the cash system first. When the credit reaches the price, the system presses F13 and the session starts. The booth never shows a price, and the session is recorded as paid at the booth's session price.
| Where | Setting | Value |
|---|---|---|
| CI2 software | Receiver name | Pix - START |
| Hotkey | F13 | |
| Costs | Your session price | |
| Nayax portal | Interface | PULSE |
| Credit per pulse | Same as the session price | |
| Pulses per vend | 1 | |
| CI2 board | Channel value | Same as credit per pulse |
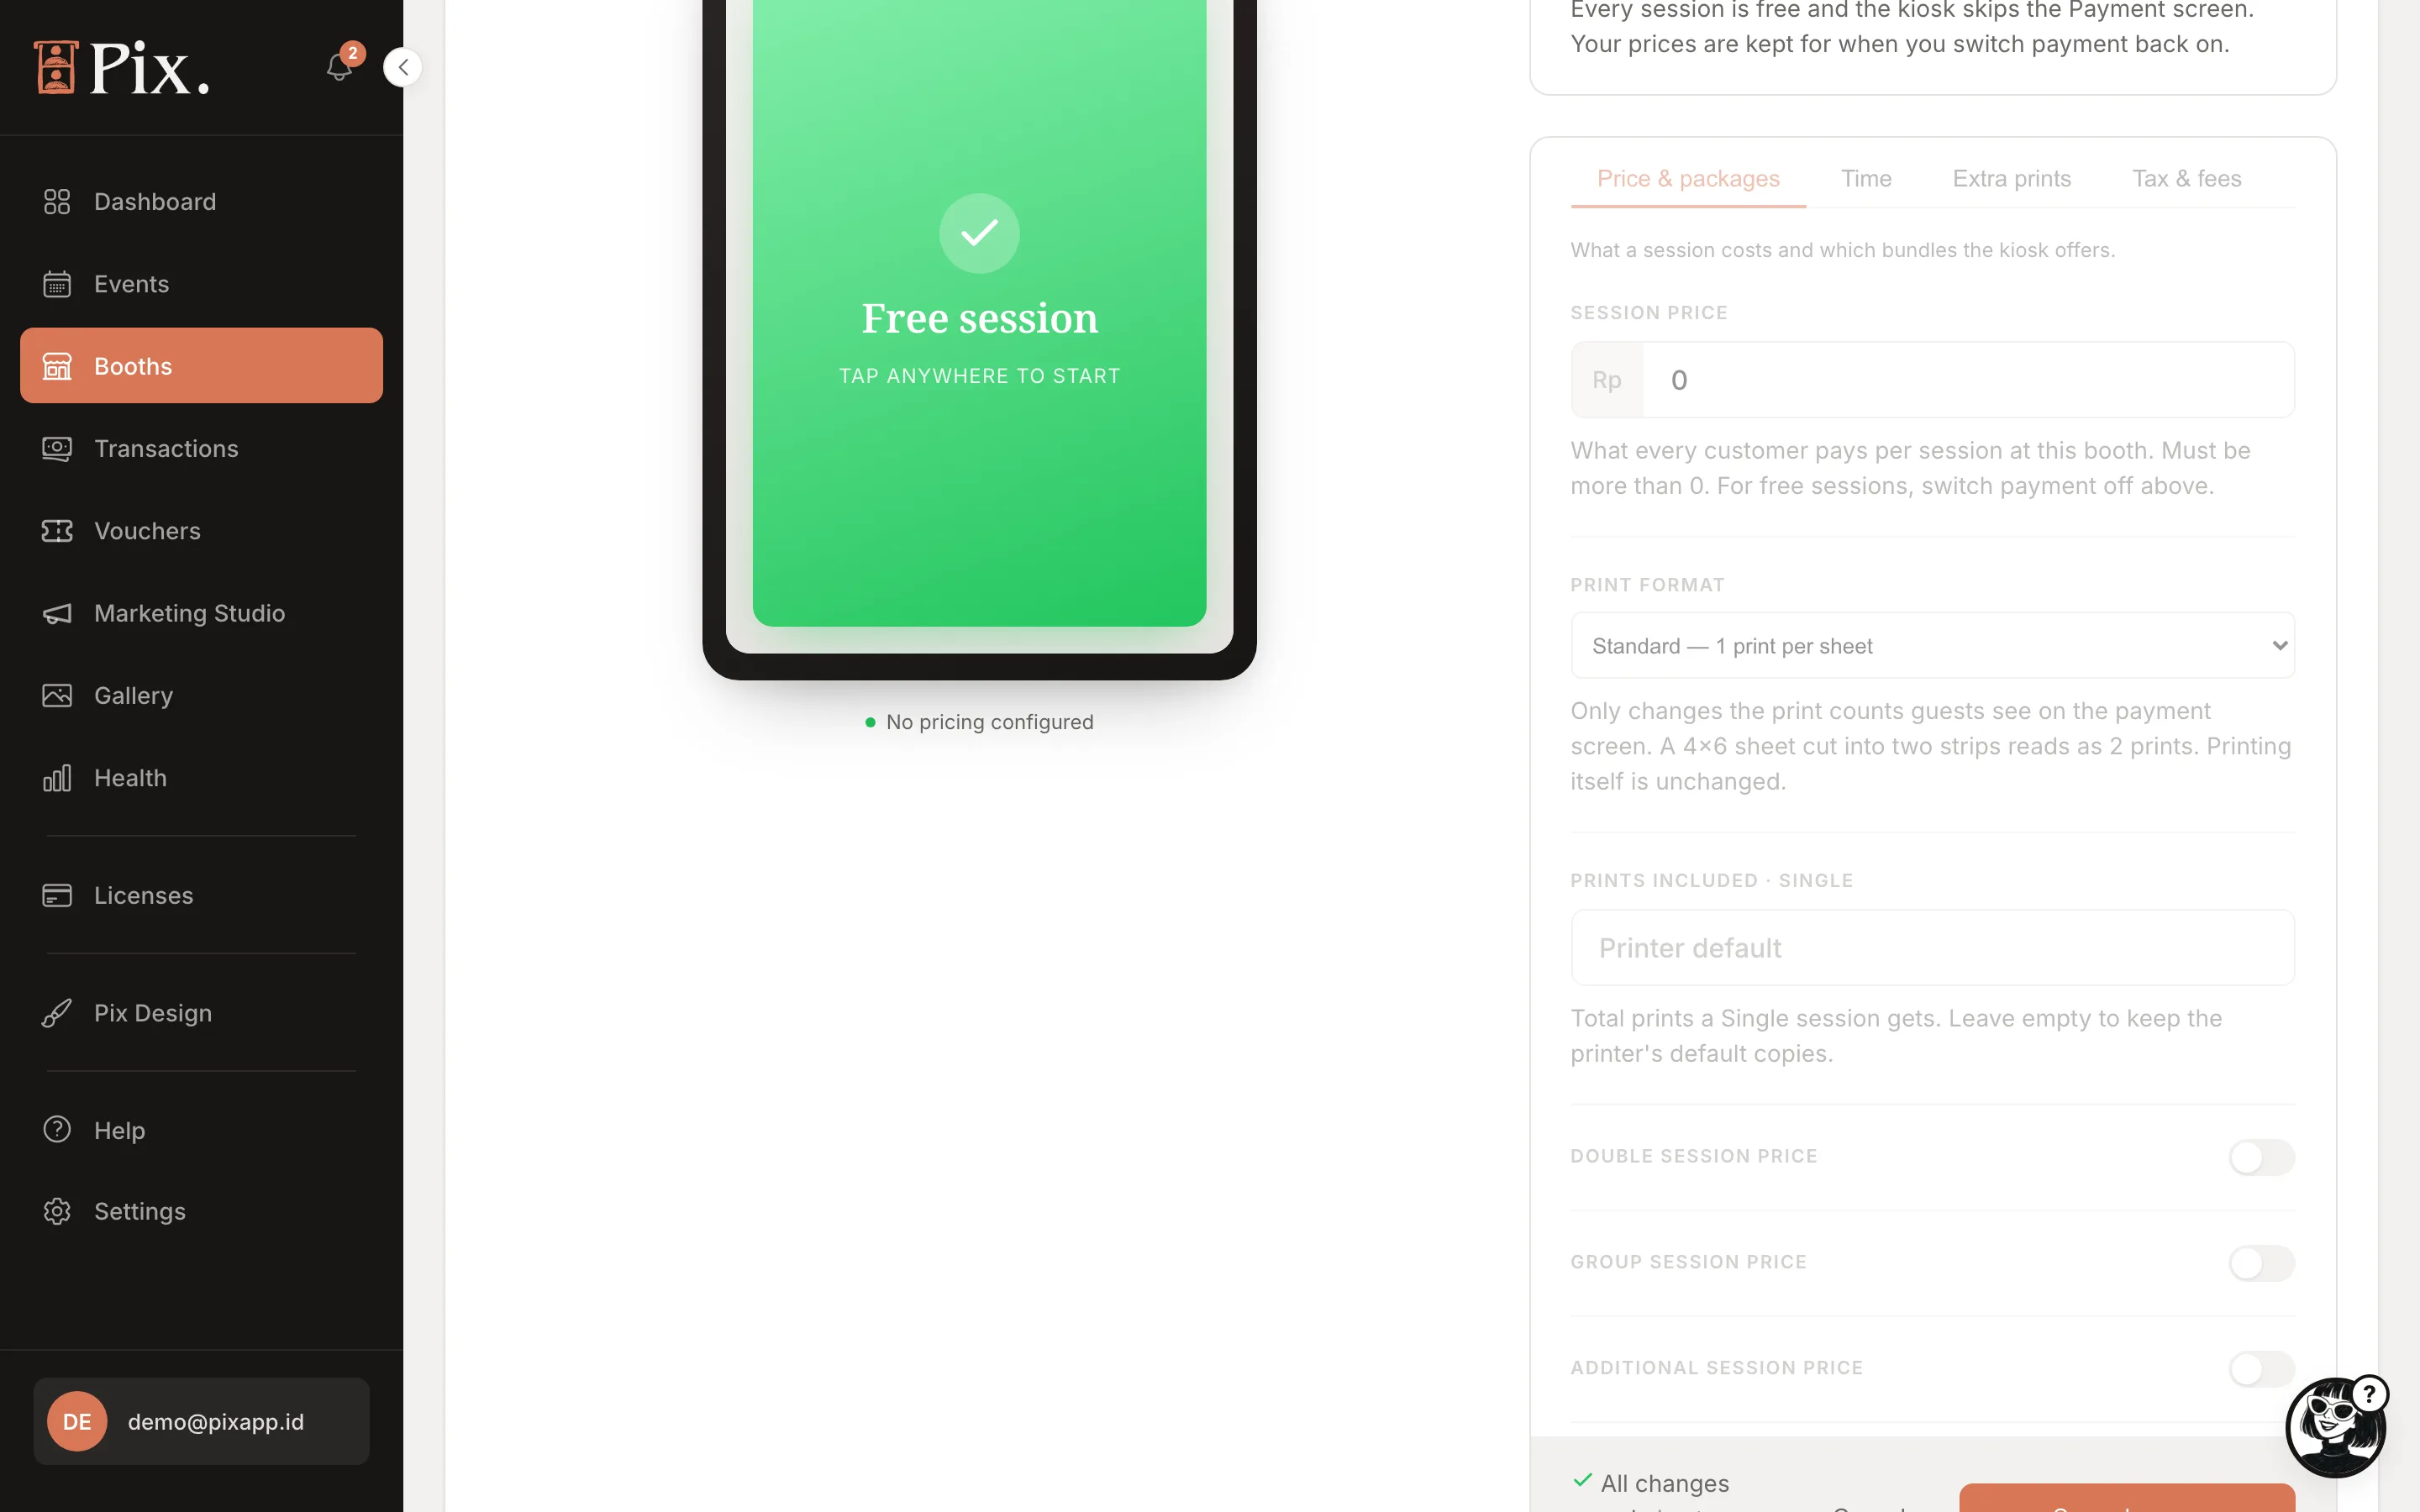
| Pix Design | Payment screen | Off |
| Session trigger | F13 only | |
| Hardware API page | Treat F13 as the cash system's paid signal | On |
- In the CI2 software, set the receiver name to Pix - START, the hotkey to F13, and the costs to your session price. For coins and notes, that is all; the board's channel values already carry each coin's worth.
- For a Nayax reader, log in to the Nayax portal, open Operations > Machines, pick the reader and set the Pulse/ccTalk attributes: Credit per Pulse to your session price, Number of Pulses per Vend to 1, Pulse Inhibit to "03 - Inhibit Enabled and Active on logic 1", and the Pulse Line Welcome Message and Pulse Title to what the reader should display (the price and "1 Photo", for example). Save, send Update Queue from Actions, then reboot the reader so the settings take effect. Set the CI2 board's channel value to the same credit per pulse.
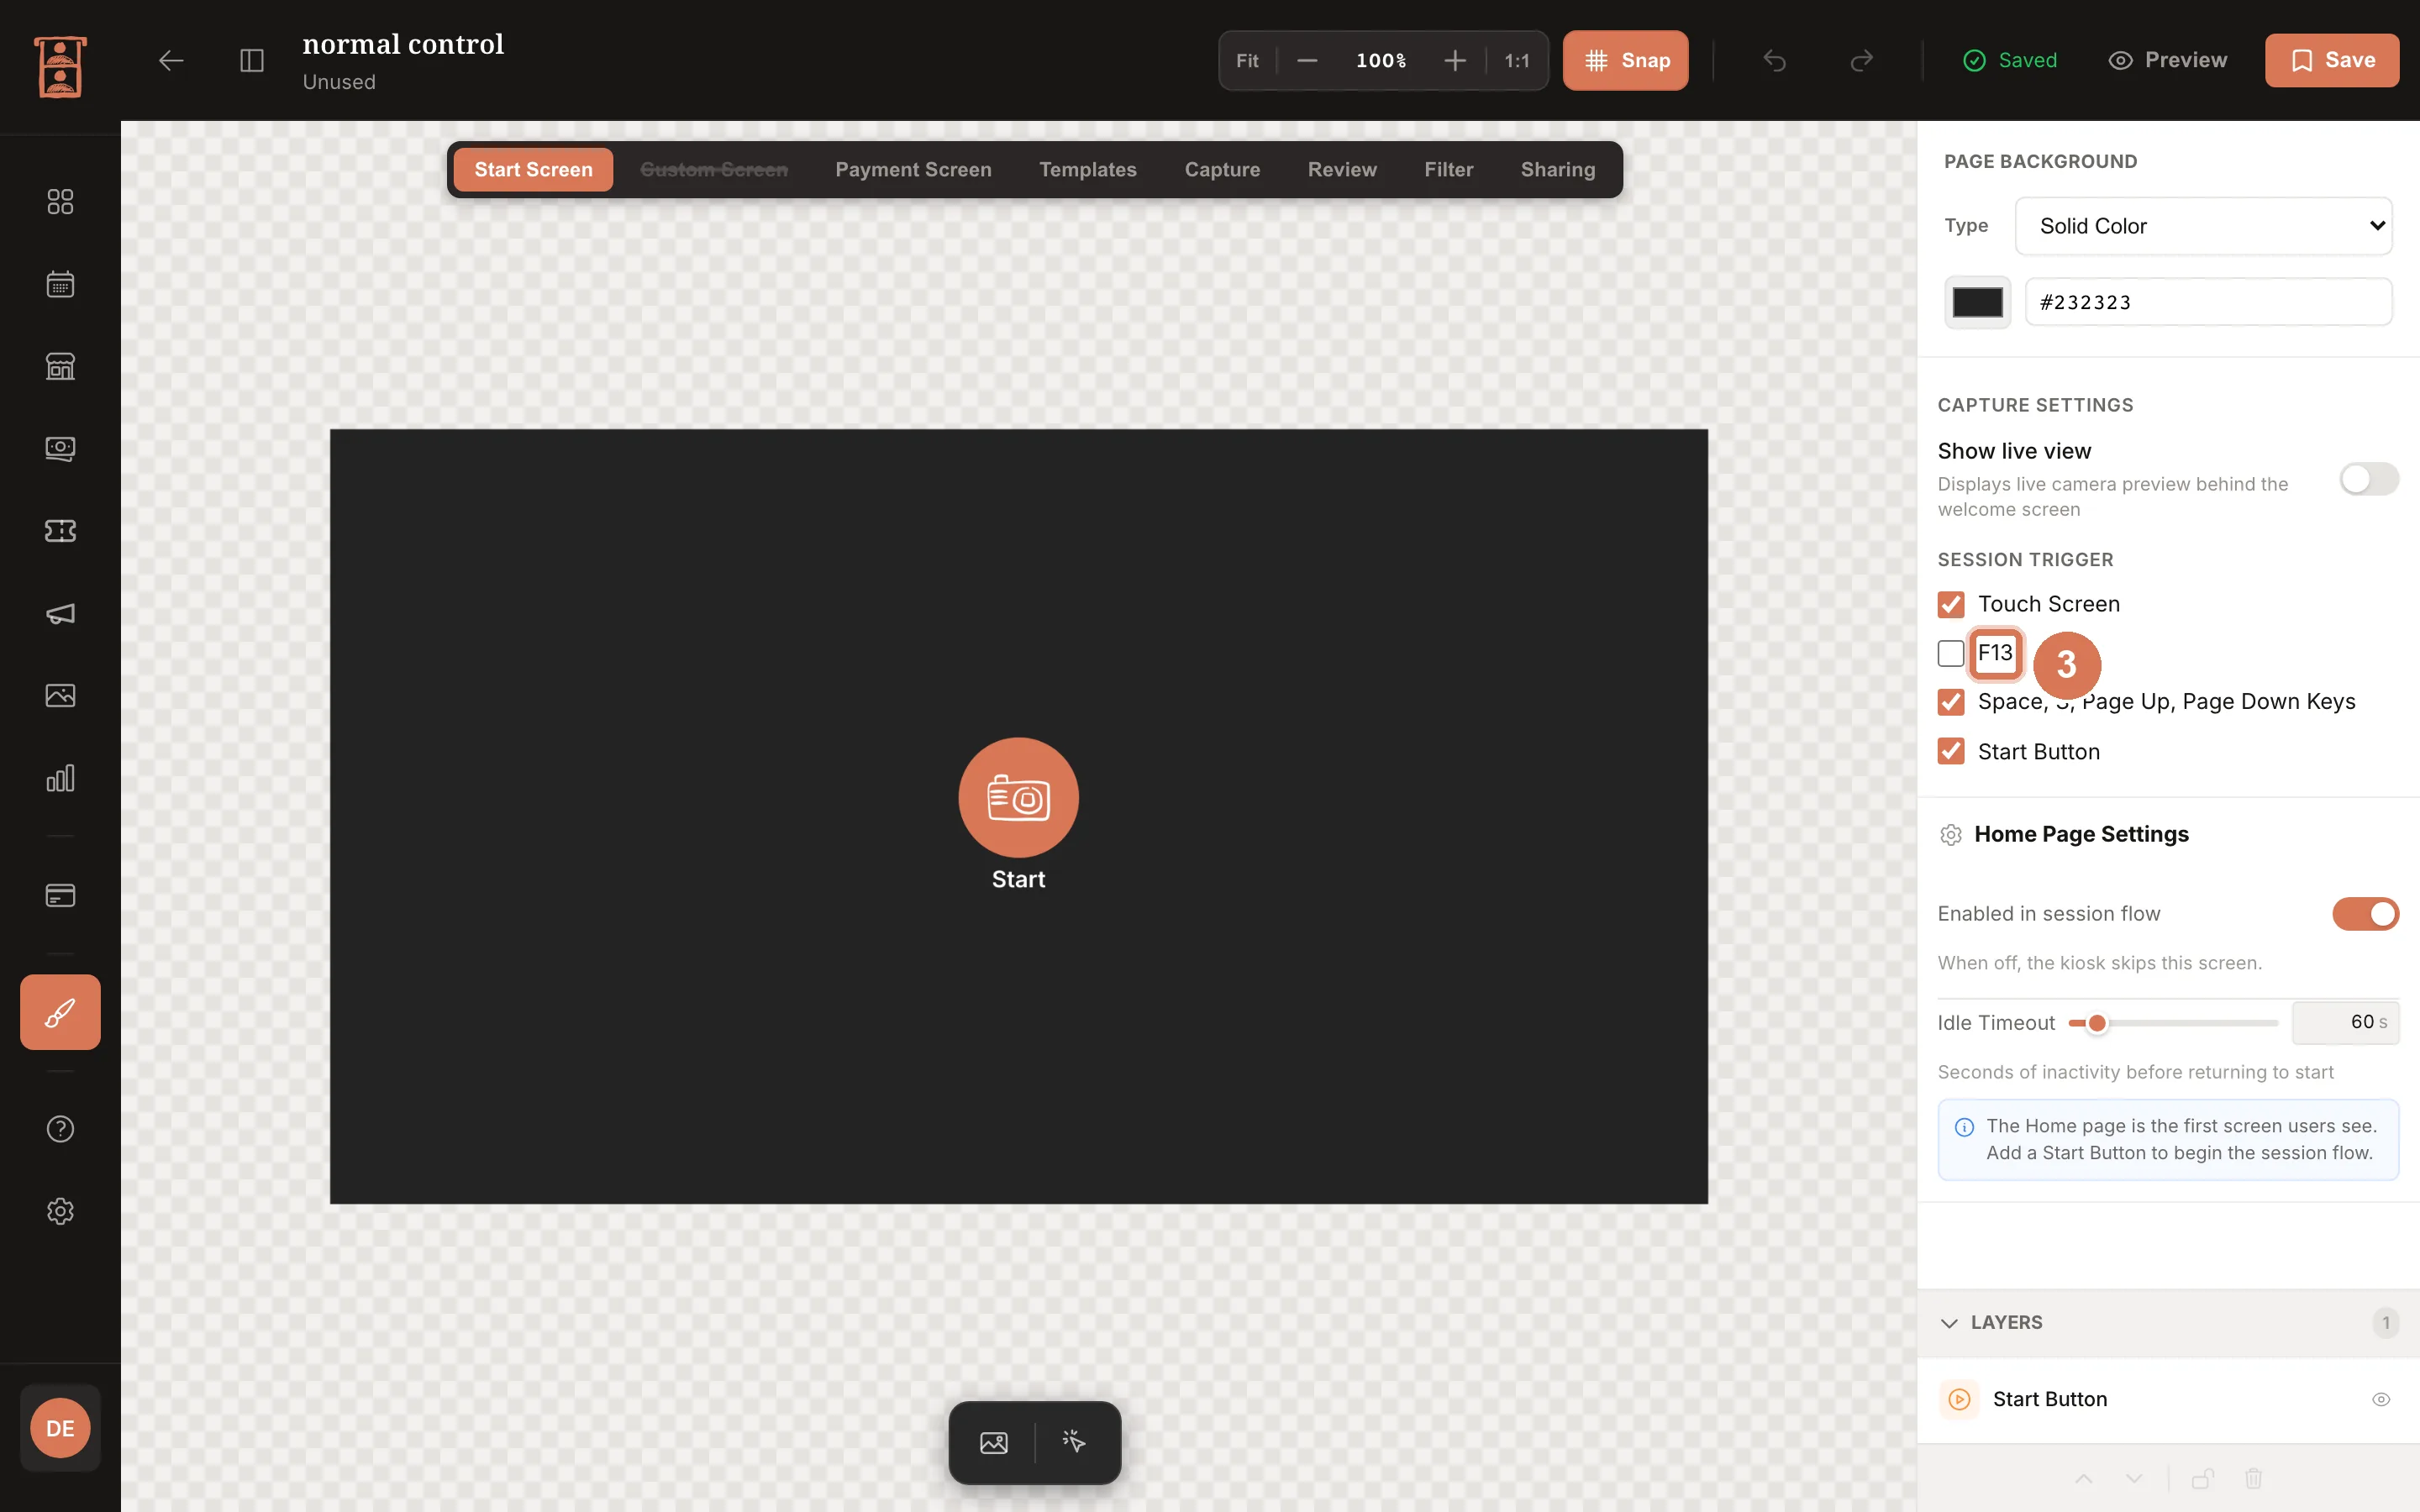
- In the UI Editor, open the booth's project. On the Payment Screen tab, turn Enabled in session flow off. On the Start Screen tab, under Session Trigger, tick F13 only and untick Touch Screen, the keys and Start Button, so nobody starts a session without paying. Save.
- On the booth, open Hardware API and turn on Treat F13 as the cash system's paid signal. The page then lists Checks for this booth: a green dot when F13 is a session trigger, and a yellow warning while Touch Screen or the navigation keys are still on.
- Tap Start Booth and feed the acceptor. The session starts by itself once the price is reached, and Transactions shows it with the session price.
F13 must stay the only session trigger. A Start Button or Touch Screen trigger next to it lets guests start for free, and the Hardware API page warns you while one is on.
Setup B2: Pay on the Payment screen
The guest picks a package on the booth's Payment screen and pays on the reader or coin box from the Card or Coin popup. The booth puts the amount due in its window title, the cash system counts the money and presses F13 once the amount is covered, and the booth records the session as paid at the amount on screen. This is the setup for packages and for a running total on screen.
| Where | Setting | Value |
|---|---|---|
| CI2 software | Receiver name | Pix - PAYMENT |
| Detect partial | On (the title also carries the amount) | |
| Variable price | On, so it reads the #amount# from the title | |
| Hotkey | F13 | |
| Nayax portal | Interface | PULSE, single price or a menu the guest picks |
| Pix Design | Payment screen | On |
| Payment methods | Debit/Credit Card and/or Coin Acceptor on | |
| Hardware API page | Treat F13 as the cash system's paid signal | On |
- In the CI2 software, set the receiver name to Pix - PAYMENT, turn Detect partial and Use variable price on, and set the hotkey to F13. While the booth waits for a hardware payment its title reads
Pix - PAYMENT #<amount>#in the currency's smallest unit, so the variable price follows whatever the guest picked. - In the UI Editor, keep the Payment Screen enabled and turn on Debit/Credit Card and/or Coin Acceptor. Save.
- On the booth, turn on Treat F13 as the cash system's paid signal on the Hardware API page. With the Payment screen on, the page shows the receiver as Pix - PAYMENT and reminds you to enable the Card or Coin method.
- Test: start a session, pick a package, tap the card or coin method and pay. The popup closes on the F13 and the booth shows Payment Success.
Pulse and keystroke setups are often one fixed price. The booth trusts the amount it showed, so a fixed-price reader plus a package reports more revenue than it collected. Confirm variable pricing on your own reader first; with a fixed price, keep packages off and sell the session price only. The Price & packages tab says the same.
Setup B3: Coins by keystroke (no F13)
For a coin or note box with a USB keyboard adapter, or a CI2 set to type one key per coin or pulse. The booth counts the keystrokes itself while its Insert Coins or Tap to Pay popup is open, and the guest watches the total climb.
- Set the acceptor to send one key (F1, for example) per unit of value; on a CI2 board, one keystroke per pulse.
- In the UI Editor, turn on Coin Acceptor (and Debit/Credit Card for a pulse-per-credit reader) under Payment Methods. Save.
- On the booth's Hardware API page, under Keyboard coin input, turn on Enable keyboard coin input, click the Coin key box and drop a coin (or press the key the hardware sends), and set Value per keystroke to what one keystroke is worth in the booth's currency. Fractional currencies settle correctly.
- Start a session, open the Coin popup, and feed the acceptor until the total is reached.
Keyboard coin input and the F13 paid signal do not mix: turning one on greys the other out, because in the start-gate the cash system does the counting.
The booth counts keystrokes, not money, and settles on the first one that covers the price. With Value per keystroke at Rp10.000 and a Rp25.000 package, the guest pays Rp30.000 (three pulses) and the booth records Rp25.000. The same goes for a Nayax reader's Credit per Pulse and a coin box's smallest coin. Pick a value that divides every price you sell, for example Rp5.000 for Rp25.000 and Rp30.000.
Note validators work like coin validators; the CI2 board has a separate BILL plug and channel values for each note. Change is the cash system's job: the CI2 can pay change from up to two hoppers, and the booth never knows about it. Extra prints bought on the Sharing screen are always paid by QR code through the gateway; a reader or coin box does not cover them.
Setup B4: A DuitNow QR Terminal in Malaysia (Transpire QR)
DuitNow QR is Malaysia's national QR standard, so almost every Malaysian bank and e-wallet app can pay it. Your payment gateway in Pixture cannot show a DuitNow QR yet (Stripe in Malaysia takes cards, not DuitNow). A Transpire QR terminal fills that gap: a small screen next to the booth shows a dynamic DuitNow QR, the guest scans and pays with their own app, and the terminal then sends coin-style pulses, the same signal a Nayax reader sends. On a CASH-Interface2 board those pulses drive setup B1 or B3 above, so nothing new is needed in Pixture.
Transpire QR (transpire.com.my) is a Malaysian company that builds these terminals for laundromats and vending machines. It is not part of Pixture: you buy the terminal and open the merchant account with Transpire, and the money settles to you through them. Pixture records the amount the booth counted, so Transactions shows the session as paid at that amount.
Ask Transpire before you buy. Their public pages do not list these, and they decide which setup you can run:
| Question | Why it matters |
|---|---|
| Can the terminal charge more than one amount (a menu, or any amount), or one fixed price? | Fixed price: use B1 with one session price and packages off. More than one amount: B3 can follow packages |
| What is one pulse worth, and can it be changed? | It becomes the Credit per pulse below. Every price you sell must be a whole number of pulses |
| Which model fits a machine that only needs a pulse output? | Transpire sells a TQR-DNQR panel and an MDB series for vending machines; a photo booth needs the pulse output |
| Terminal price, fees and payout time | Transpire does not publish them |
| Merchant registration | Expect to need your Malaysian business registration (SSM), as with any Malaysian payment provider |
Wiring. Transpire's terminal has an optically isolated pulse output with a configurable format, made to replace a coin acceptor's signal. Connect it to the CASH-Interface2 board's PULSE input (through a PULSE adapter if the board needs one), the way a Nayax reader is connected. Unplug the board's 12 V supply before you connect anything.
| Where | Setting | B1 start-gate (one price) | B3 counting (any amount) |
|---|---|---|---|
| Transpire terminal | Price | Your session price, in RM | The amounts guests may pay |
| Credit per pulse | The whole session price (one pulse per session) | A small unit that divides every price, for example RM1 | |
| CI2 board | Channel value | Same as credit per pulse | Same as credit per pulse |
| CI2 software | Receiver name | Pix - START | One keystroke per pulse, no receiver needed |
| Hotkey | F13 | The key it types per pulse (F1, for example) | |
| Pix Design | Payment screen | Off | On, with Debit/Credit Card on |
| Session trigger | F13 only | Your usual trigger | |
| Hardware API page | Treat F13 as the cash system's paid signal | On | Off |
| Keyboard coin input | Off | On, Value per keystroke = credit per pulse |
- Set the booth's currency to MYR and its Session price on the Pricing tab (see Booth Pricing).
- Have Transpire set the terminal's price and pulse value to match the table. The terminal's pulse settings are on Transpire's side, not in Pixture.
- Follow B1 above for a single price: receiver Pix - START, F13 as the only session trigger, and Treat F13 as the cash system's paid signal on.
- Or follow B3 to let the booth count: set the CI2 board to type one key per pulse, turn on Debit/Credit Card in the UI Editor, and on the Hardware API page turn on Enable keyboard coin input with Value per keystroke equal to one pulse. The Tap to Pay popup shows the amount received so far against the price, and continues once the price is covered.
- Pay a real, small amount with a Malaysian bank app. Check that the session starts, that Transactions in the Pixture dashboard shows it at the price, and that the same payment appears in Transpire's own sales report.
The booth counts pulses, not ringgit. With RM10 per pulse and a RM15 package, the guest has to pay RM20 and the booth records RM15. Pick a pulse value that divides every price you sell, or sell one price with B1.
Setup C: Your Own Bridge on the Local Hardware API
If your hardware can make an HTTP request (a PLC, a bridge box, a card terminal with a webhook), the booth runs a small API on the computer.
- On the booth, open the operator menu > Hardware API.
- Turn on Enable local API. It listens on Port 14500 by default; change it if that port is taken.
- Leave Allow LAN access off if the bridge runs on the booth computer itself; turn it on if the bridge sits elsewhere on the same network. The page shows this PC's address.
- Read the Access token off the screen and put it in your bridge. Regenerate issues a new token and invalidates the old one.
Every request must carry the token. The page lists the endpoints:
| Endpoint | Use it to |
|---|---|
GET /api/v1/status | Read the current screen, the payment state, and the amount due with its currency, so the bridge takes the price from the booth instead of holding its own copy |
GET /api/v1/start | Start a session, with the same guards as a guest tap. Refused (409) when the booth is not on the Start screen |
GET /api/v1/payment-complete | Mark the amount on the Payment screen as paid. Accepted only while the booth is waiting for a hardware payment; otherwise 409 |
A typical bridge polls /api/v1/status, waits until the booth is on the Payment screen, charges the amount it reads there, and calls /api/v1/payment-complete once the reader confirms. A start-gate bridge charges a fixed price first and calls /api/v1/start. Check the status before taking money: a blocked computer refuses to start sessions.
Setup D: Cash at the Counter, as Voucher Codes
For an attended booth where a person takes the cash, a batch of single-use voucher codes turns each payment into a ticket the booth understands, and keeps the revenue in your reports.
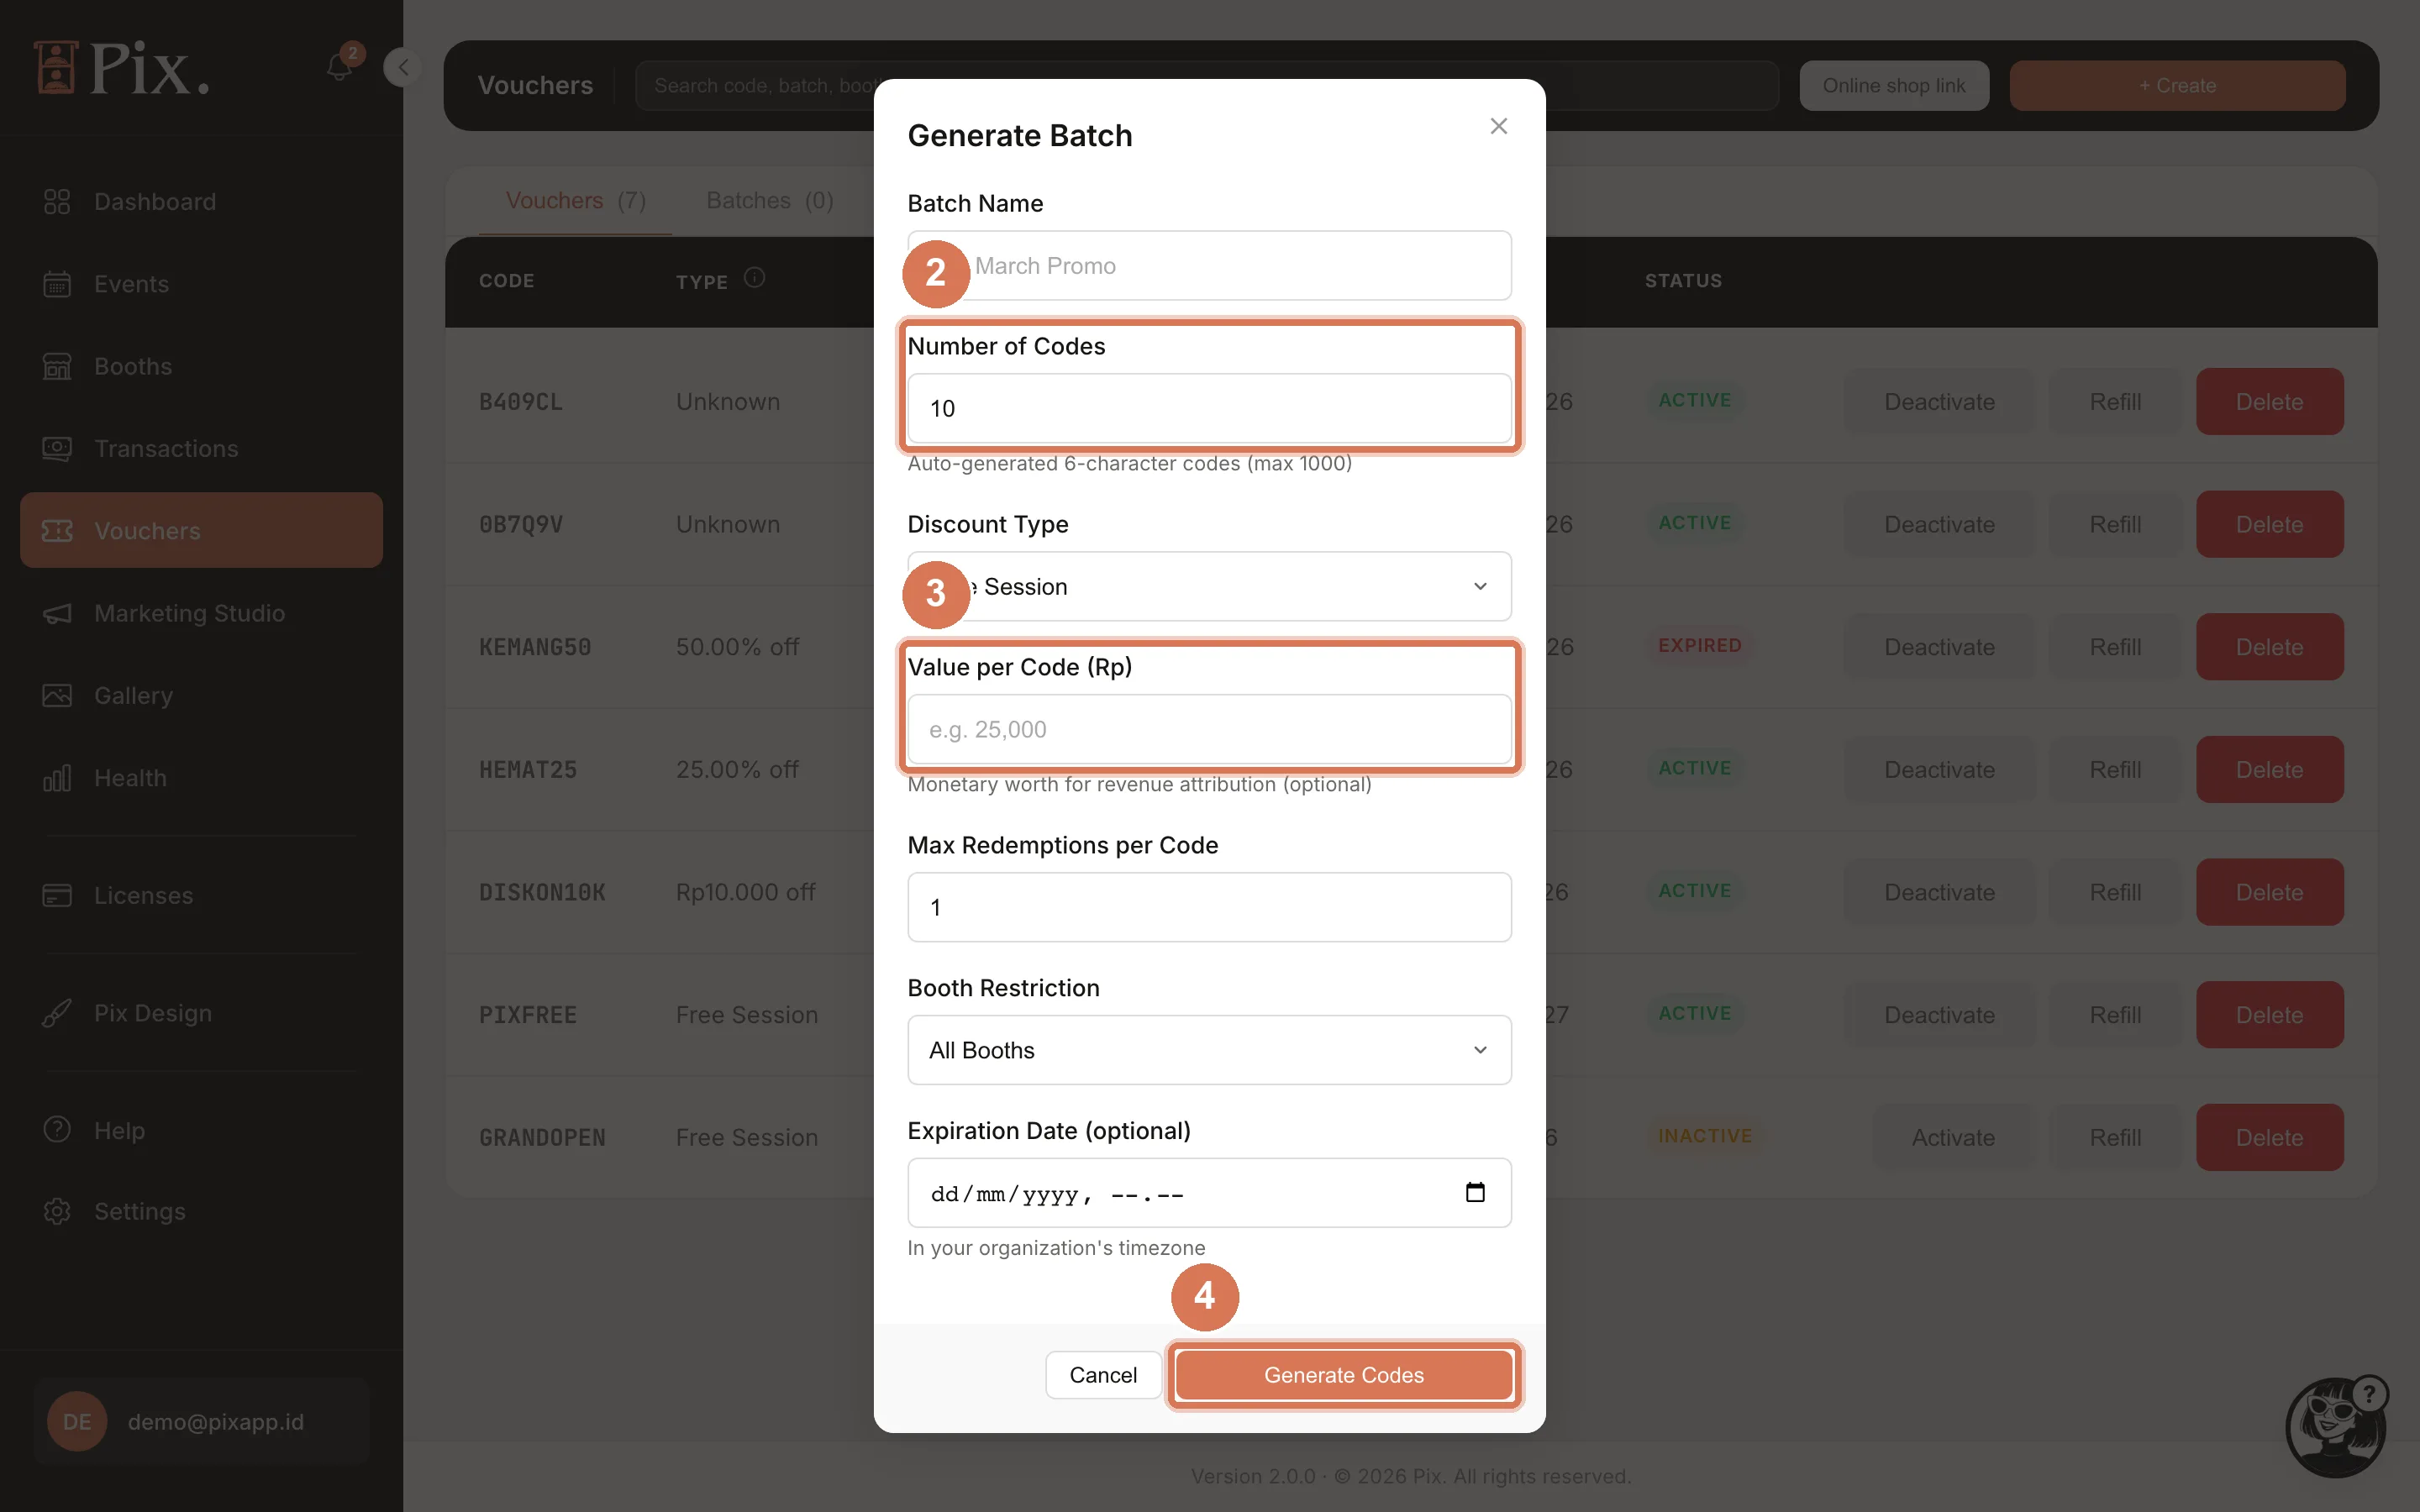
- Open Vouchers, click + Create, then Generate Batch.
- Give the batch a Batch Name (the venue and month, for example), the Number of Codes you need (6-character codes, up to 1000 per batch), and set Discount Type to Free Session.
- Enter the Value per Code: your session price. That amount is attributed to each redeemed session in Transactions, so cash sales count as revenue.
- Leave Max Redemptions per Code at 1, restrict the batch to the booth under Booth Restriction if you like, set an Expiration Date for the end of the day or the event, and click Generate Codes. The batch and its codes appear under the Batches tab.
- The cashier takes the money and hands over one code. On the booth's Payment screen the guest taps Voucher and types it; the booth shows Payment Success and continues.
Keep QR Pay on as well, so guests who would rather pay on their phone still can. For customers who want to pay before they arrive, Sell Sessions Online does the same with a link instead of a cashier.
Check It Worked
- Run a paid test session with the hardware or a code.
- In the dashboard, open Transactions: the session is listed with the amount the hardware reported or the code's value, not as a free session, and it counts toward Total Revenue.
- The dashboard home Revenue card picks it up as well.
Troubleshooting
| Symptom | Cause | Fix |
|---|---|---|
| Coins go in but nothing happens on the Start screen (B1) | The receiver name does not match the window title, or F13 is not ticked as a trigger | Use Pix - START exactly; tick F13 on the Start Screen |
| Sessions start without payment (B1) | Touch Screen or Start Button is still ticked | Leave F13 as the only session trigger |
| The Payment screen popup never closes (B2) | The receiver name is not Pix - PAYMENT, or Detect partial is off so the amount in the title is not read | Set the receiver name and turn Detect partial and Use variable price on |
| Paid sessions show as free in Transactions | Treat F13 as the cash system's paid signal is off, or the app is older than 1.1.87 | Turn the toggle on; update the app from the operator menu |
| The total on the Coin popup climbs by the wrong amount (B3) | Value per keystroke does not match the acceptor's unit | Correct one of them |
| The F13 toggle is greyed out on the Hardware API page | Enable keyboard coin input is on | Turn keyboard coin input off; the two setups do not mix |
| A Nayax reader shows "Cash only" | Its inhibit is active: the portal inhibit is on without the wire, or the CI2 software is not active (the board's yellow LED is off) | Fix it on the Nayax side first; for a test, disable the inhibit in the Nayax portal and restart the reader |
| A guest paid on the DuitNow terminal but the booth did not react (B4) | The terminal's pulse output is not reaching the CI2 board, or its pulse value does not match the channel value | Check the wiring to the PULSE input, then compare Transpire's credit per pulse with the CI2 channel value and Value per keystroke |
| The booth says "Card reader payment could not be started" (A) | The booth's currency is not your Stripe account's currency, or the reader is offline | Set the booth's currency to the account's currency; check the reader is online under Terminal in Stripe |
| A guest was charged on the reader but no session was recorded (A) | The booth closed or lost power after the tap, before it saw the payment | Find the payment under Payments in Stripe, then refund it or give the guest a voucher code |
| The Stripe reader is not in the dropdown | It is not registered on this Stripe account, or is offline | Register it under Terminal in Stripe and connect it to Wi-Fi |
| The bridge gets 409 | Wrong screen for that call | Poll /api/v1/status; call /start only on the Start screen and /payment-complete only while a payment is awaited |
| The bridge's requests are rejected | Missing or old token | Copy the current Access token; Regenerate invalidates the old one |
| The Payment screen never appears | Payment on this booth is off, or the computer is on Pix Starter | Turn the switch on; the computer needs Pix Pro |