Template Editor
A print template is the layout a guest's photos land in: the 4x6" print, the 2x6" strip, the sticker sheet. In Pix Design you build one from a single PNG. Wherever the PNG is transparent, the editor places a photo slot; everything opaque (frames, logos, text) prints on top of the photos. By the end of this page you will have a template project saved and assigned to at least one booth.
Before You Start
- A PNG of your design at the print size you want (see Preparing the PNG). The file can be up to 15 MB.
- Pix Pro on your account. On Pix Starter the editor opens and you can try everything, but creating a new project needs Pix Pro; see Pix Design Overview.
The Template Projects List
Pix Design > Template Editor opens the Template Projects list.
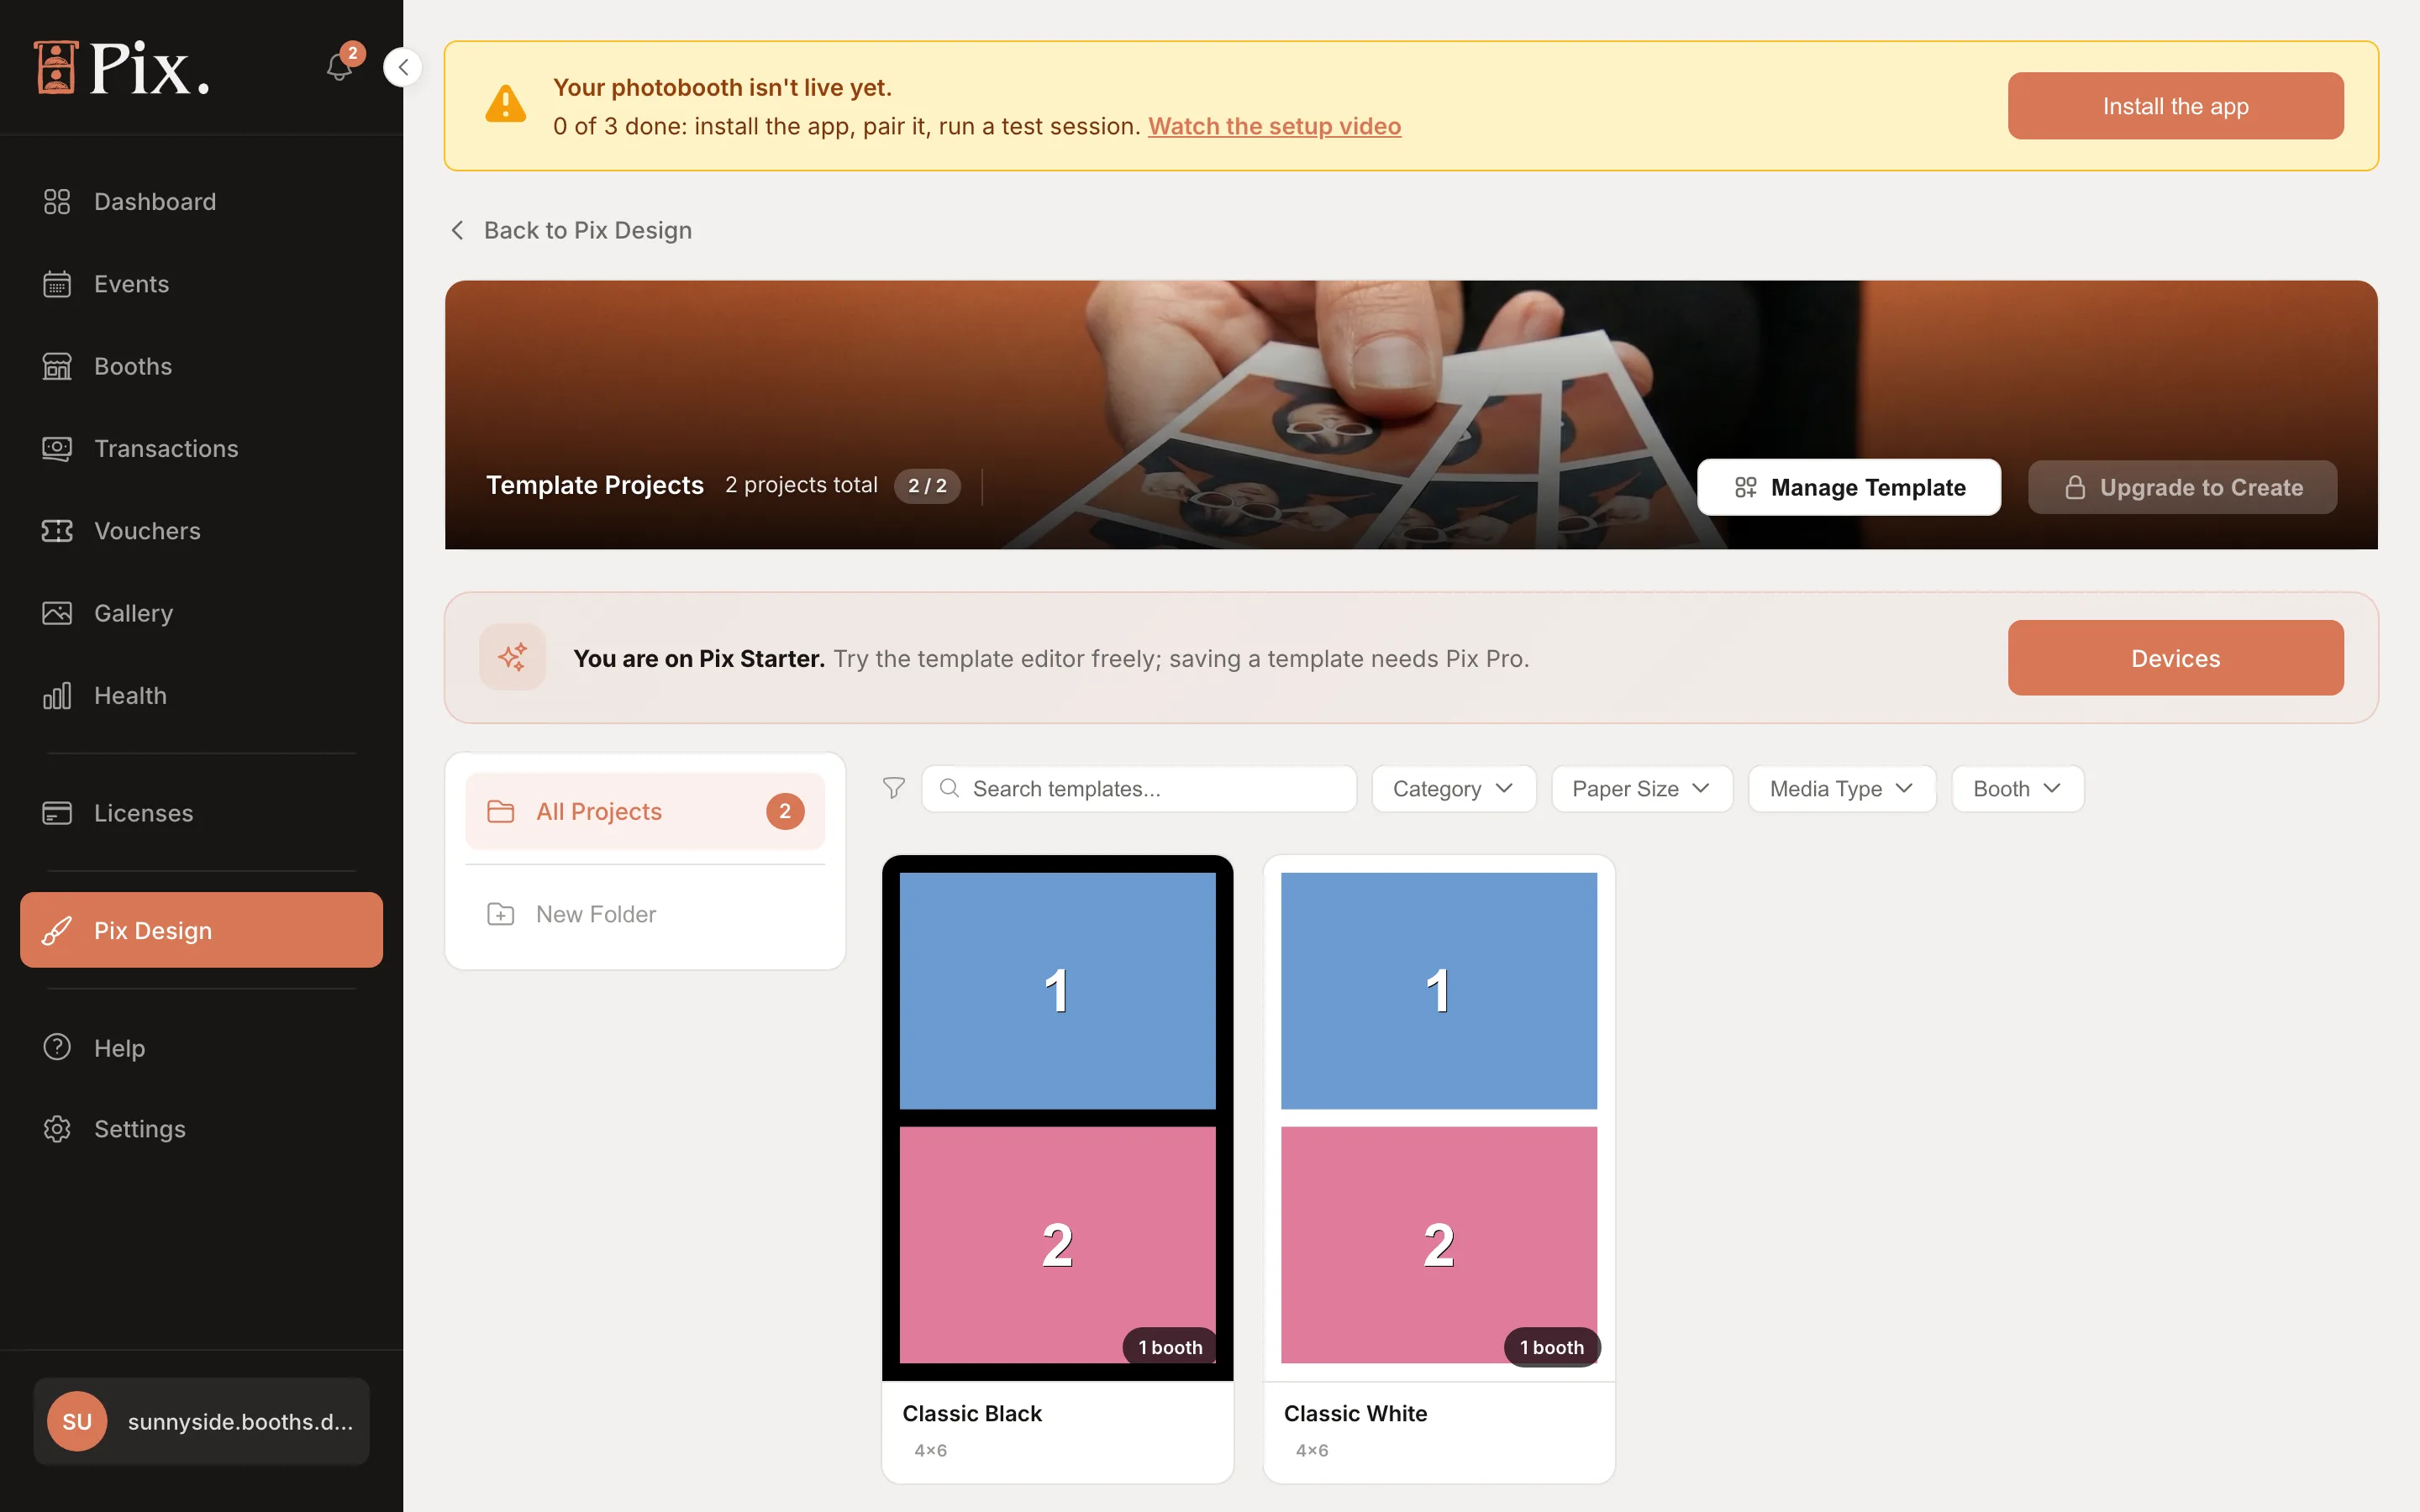
- The folder column on the left starts with All Projects; New Folder adds your own. See Folders and Categories.
- The Category, Paper Size, Media Type and Booth filters and the search box narrow the grid. Booth shows only the templates assigned to one booth, and adds a Manage templates button for that booth; see Assigning Templates.
- Each card carries a booth count badge, such as "20 booths", so you can see where a design is in use. The card menu offers Rename, Assign to booths and Delete.
- Delete asks you to type DELETE. If booths still use the template, a second step lists them ("In use on ...") and offers Unassign & delete, which removes it from those booths and deletes it in one go.
- Manage Template picks a booth and opens that booth's template list in a window on this page.
- New Project starts a template. On Pix Starter the header reads 2 / 2 and the button reads Upgrade to Create, as in the screenshot above; the two ready-made templates, Classic Black and Classic White, come with every account.
Preparing the PNG
Pixture prints at 600 DPI, so the PNG should match the print size in pixels:
| Print size | Pixels | Typical use |
|---|---|---|
| 2x6" | 1200 x 3600 | Classic photo strip |
| 4x6" | 2400 x 3600 | Standard print, the default |
| 6x8" | 3600 x 4800 | Large print |
| A4, A3 | Shown on the size card | Poster-size prints |
| Custom | Set pixels | Anything else |
Three rules make a PNG work as a template:
- Transparent areas become photo slots. Cut a fully transparent window wherever a photo should appear. One window is one slot, and the booth takes one photo per slot, in slot order.
- Keep everything else opaque. Frames, logos and text print over the photos. Transparent areas outside the photo slots print white.
- Match the size. A file at another size is auto-resized to fit the chosen print size, so keep the same aspect ratio to avoid stretching.
No transparency in your design? A JPG, or a PNG with solid white boxes where the photos go, still works: upload it and use Remove BG in the editor to turn those boxes transparent, or draw slots over the artwork and let Cut out artwork clear them. Both are described under The Editor.
Creating a Template Project
-
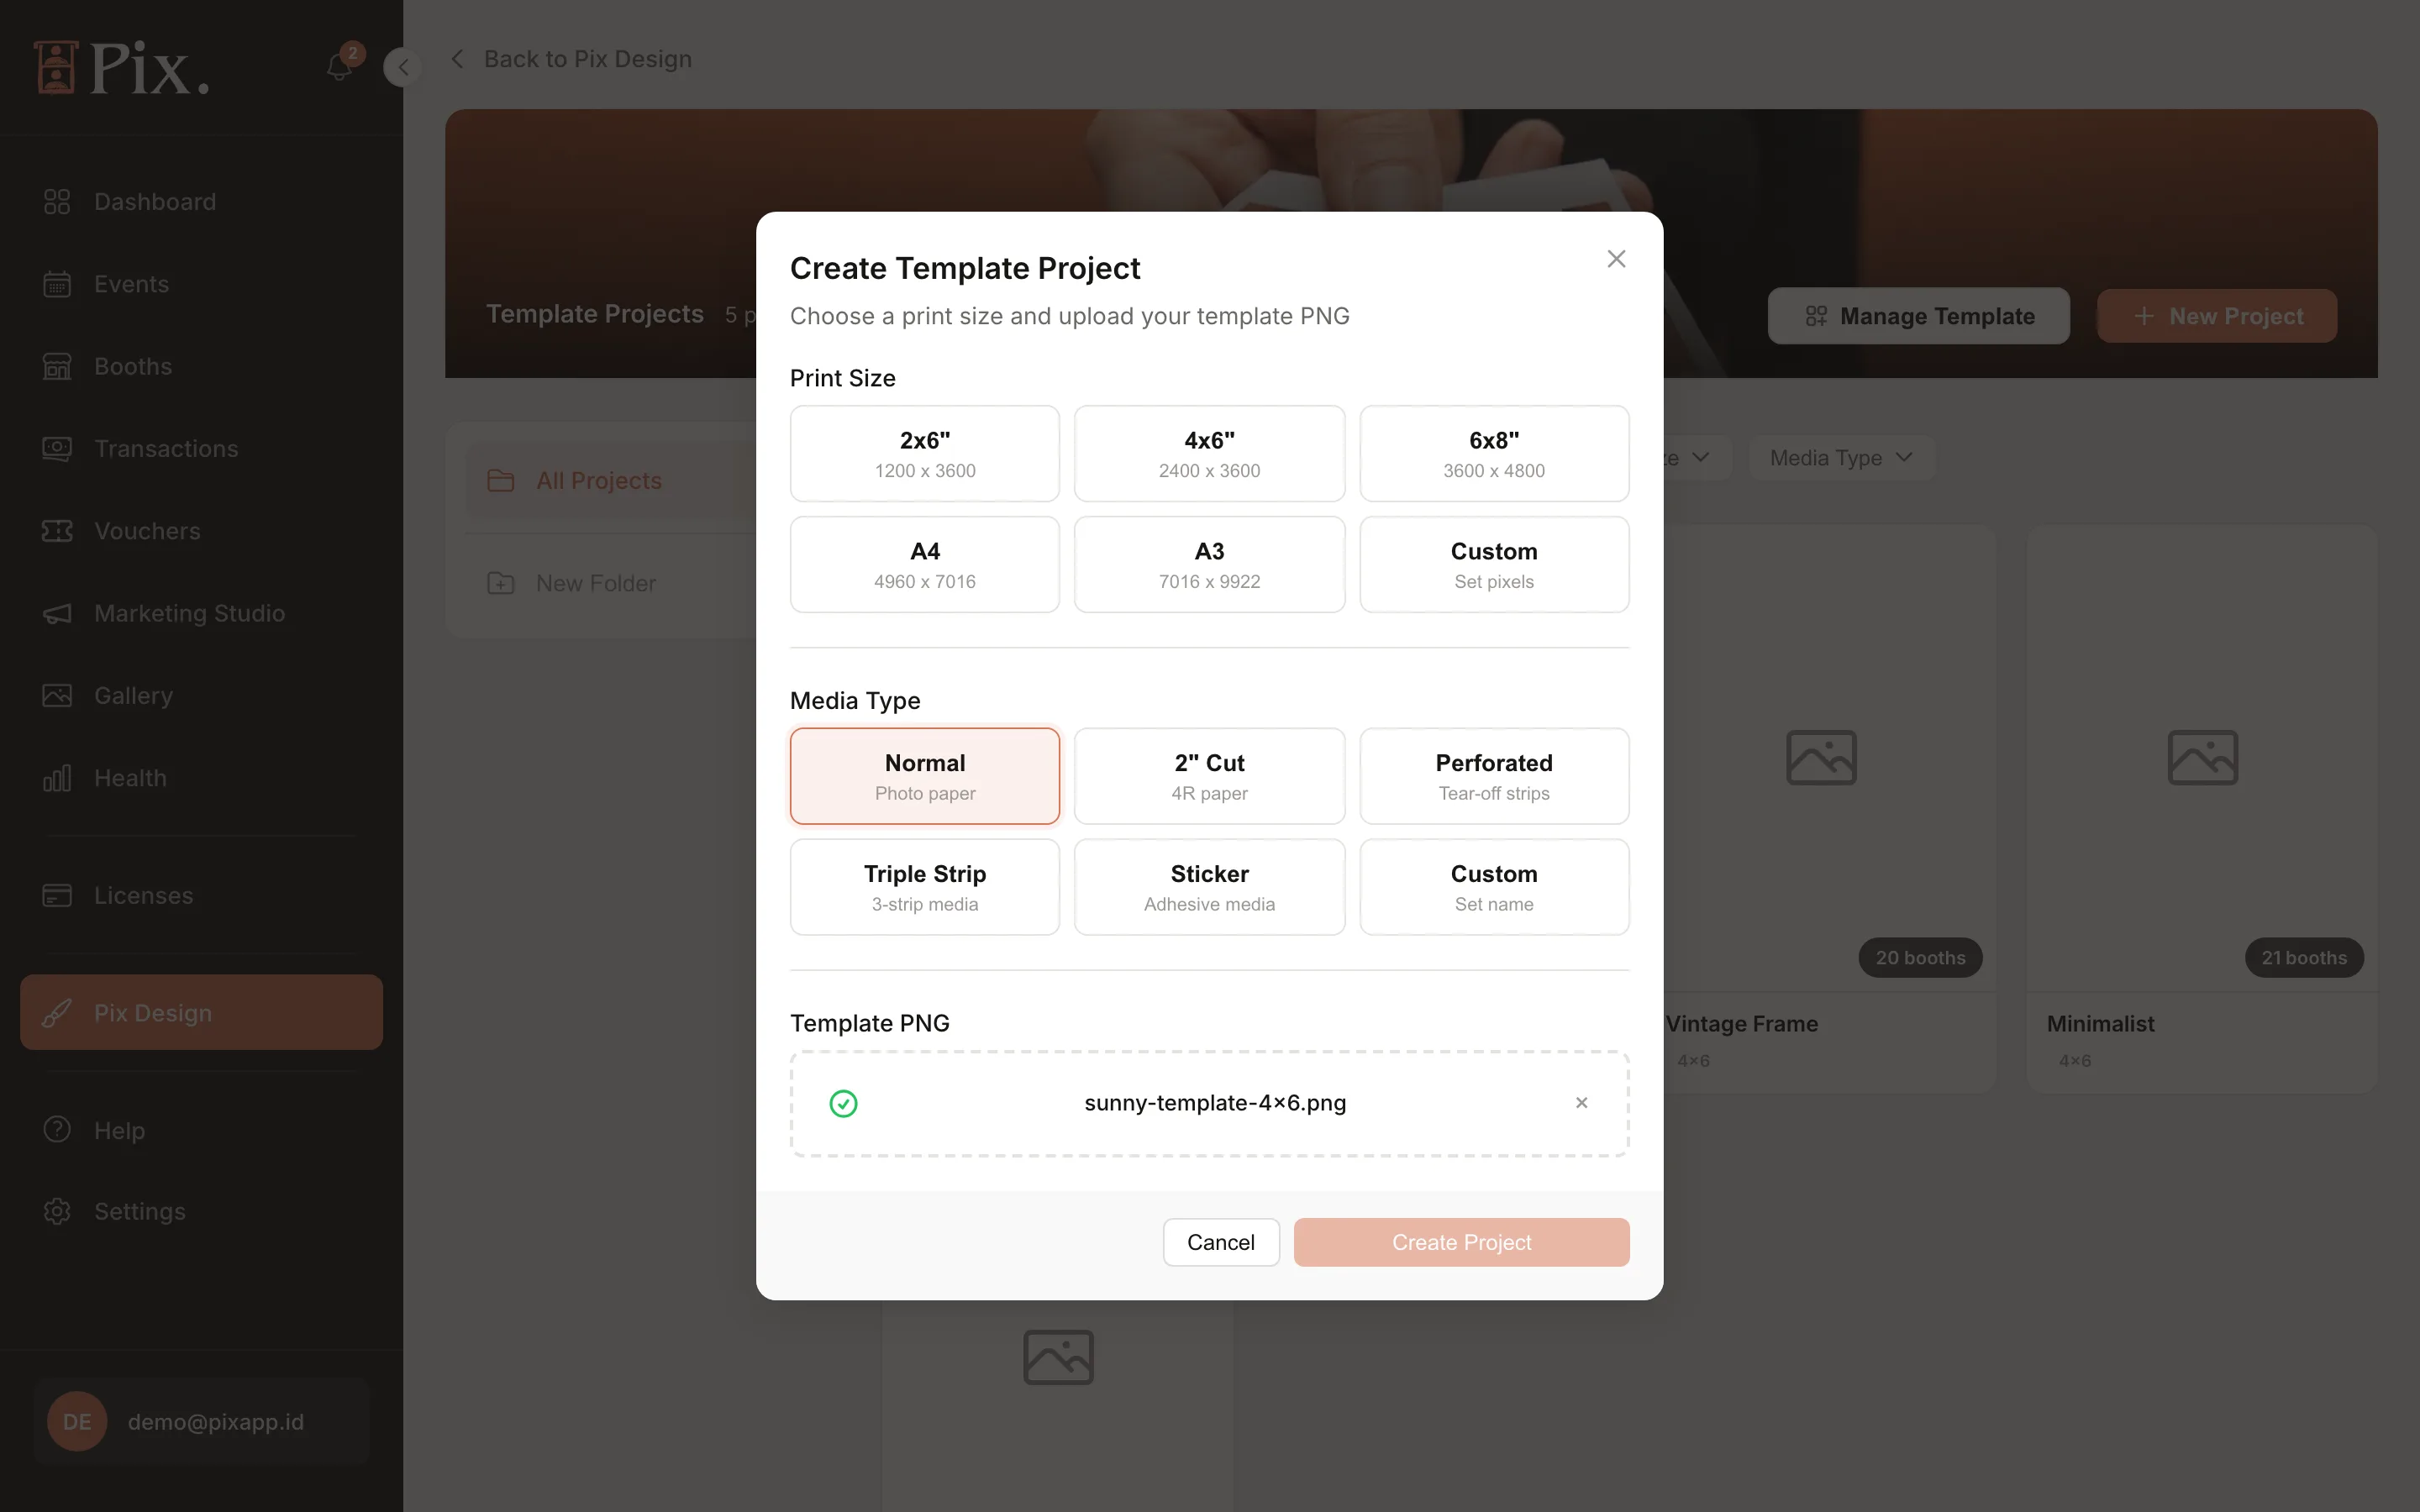
Click New Project. The Create Template Project modal opens.
-
Pick a Print Size card: 2x6", 4x6", 6x8", A4, A3 or Custom (Set pixels).
-
Pick a Media Type card. This tells the booth what the printed sheet becomes for the guest:
- Normal (Photo paper): one print per sheet.
- 2" Cut (4R paper): a 4x6" sheet the printer cuts into two 2x6" strips, so the guest gets two strips.
- Perforated (Tear-off strips): perforated media the guest tears apart.
- Triple Strip (3-strip media): a sheet that becomes three strips.
- Sticker (Adhesive media): sticker paper.
- Custom (Set name): any other stock, named by you.
-
Drop your PNG or JPG on the Template PNG zone or click it to browse. A JPG is stored as PNG.
-
Click Create Project. The button enables once a size and a file are chosen.
The Editor
The project opens in the editor. If no PNG is loaded yet, the canvas reads "Drop PNG here or click to browse. Target: 2400 × 3600 px (4×6 at 600 DPI), images will be auto-resized to fit." The target follows the print size you chose.
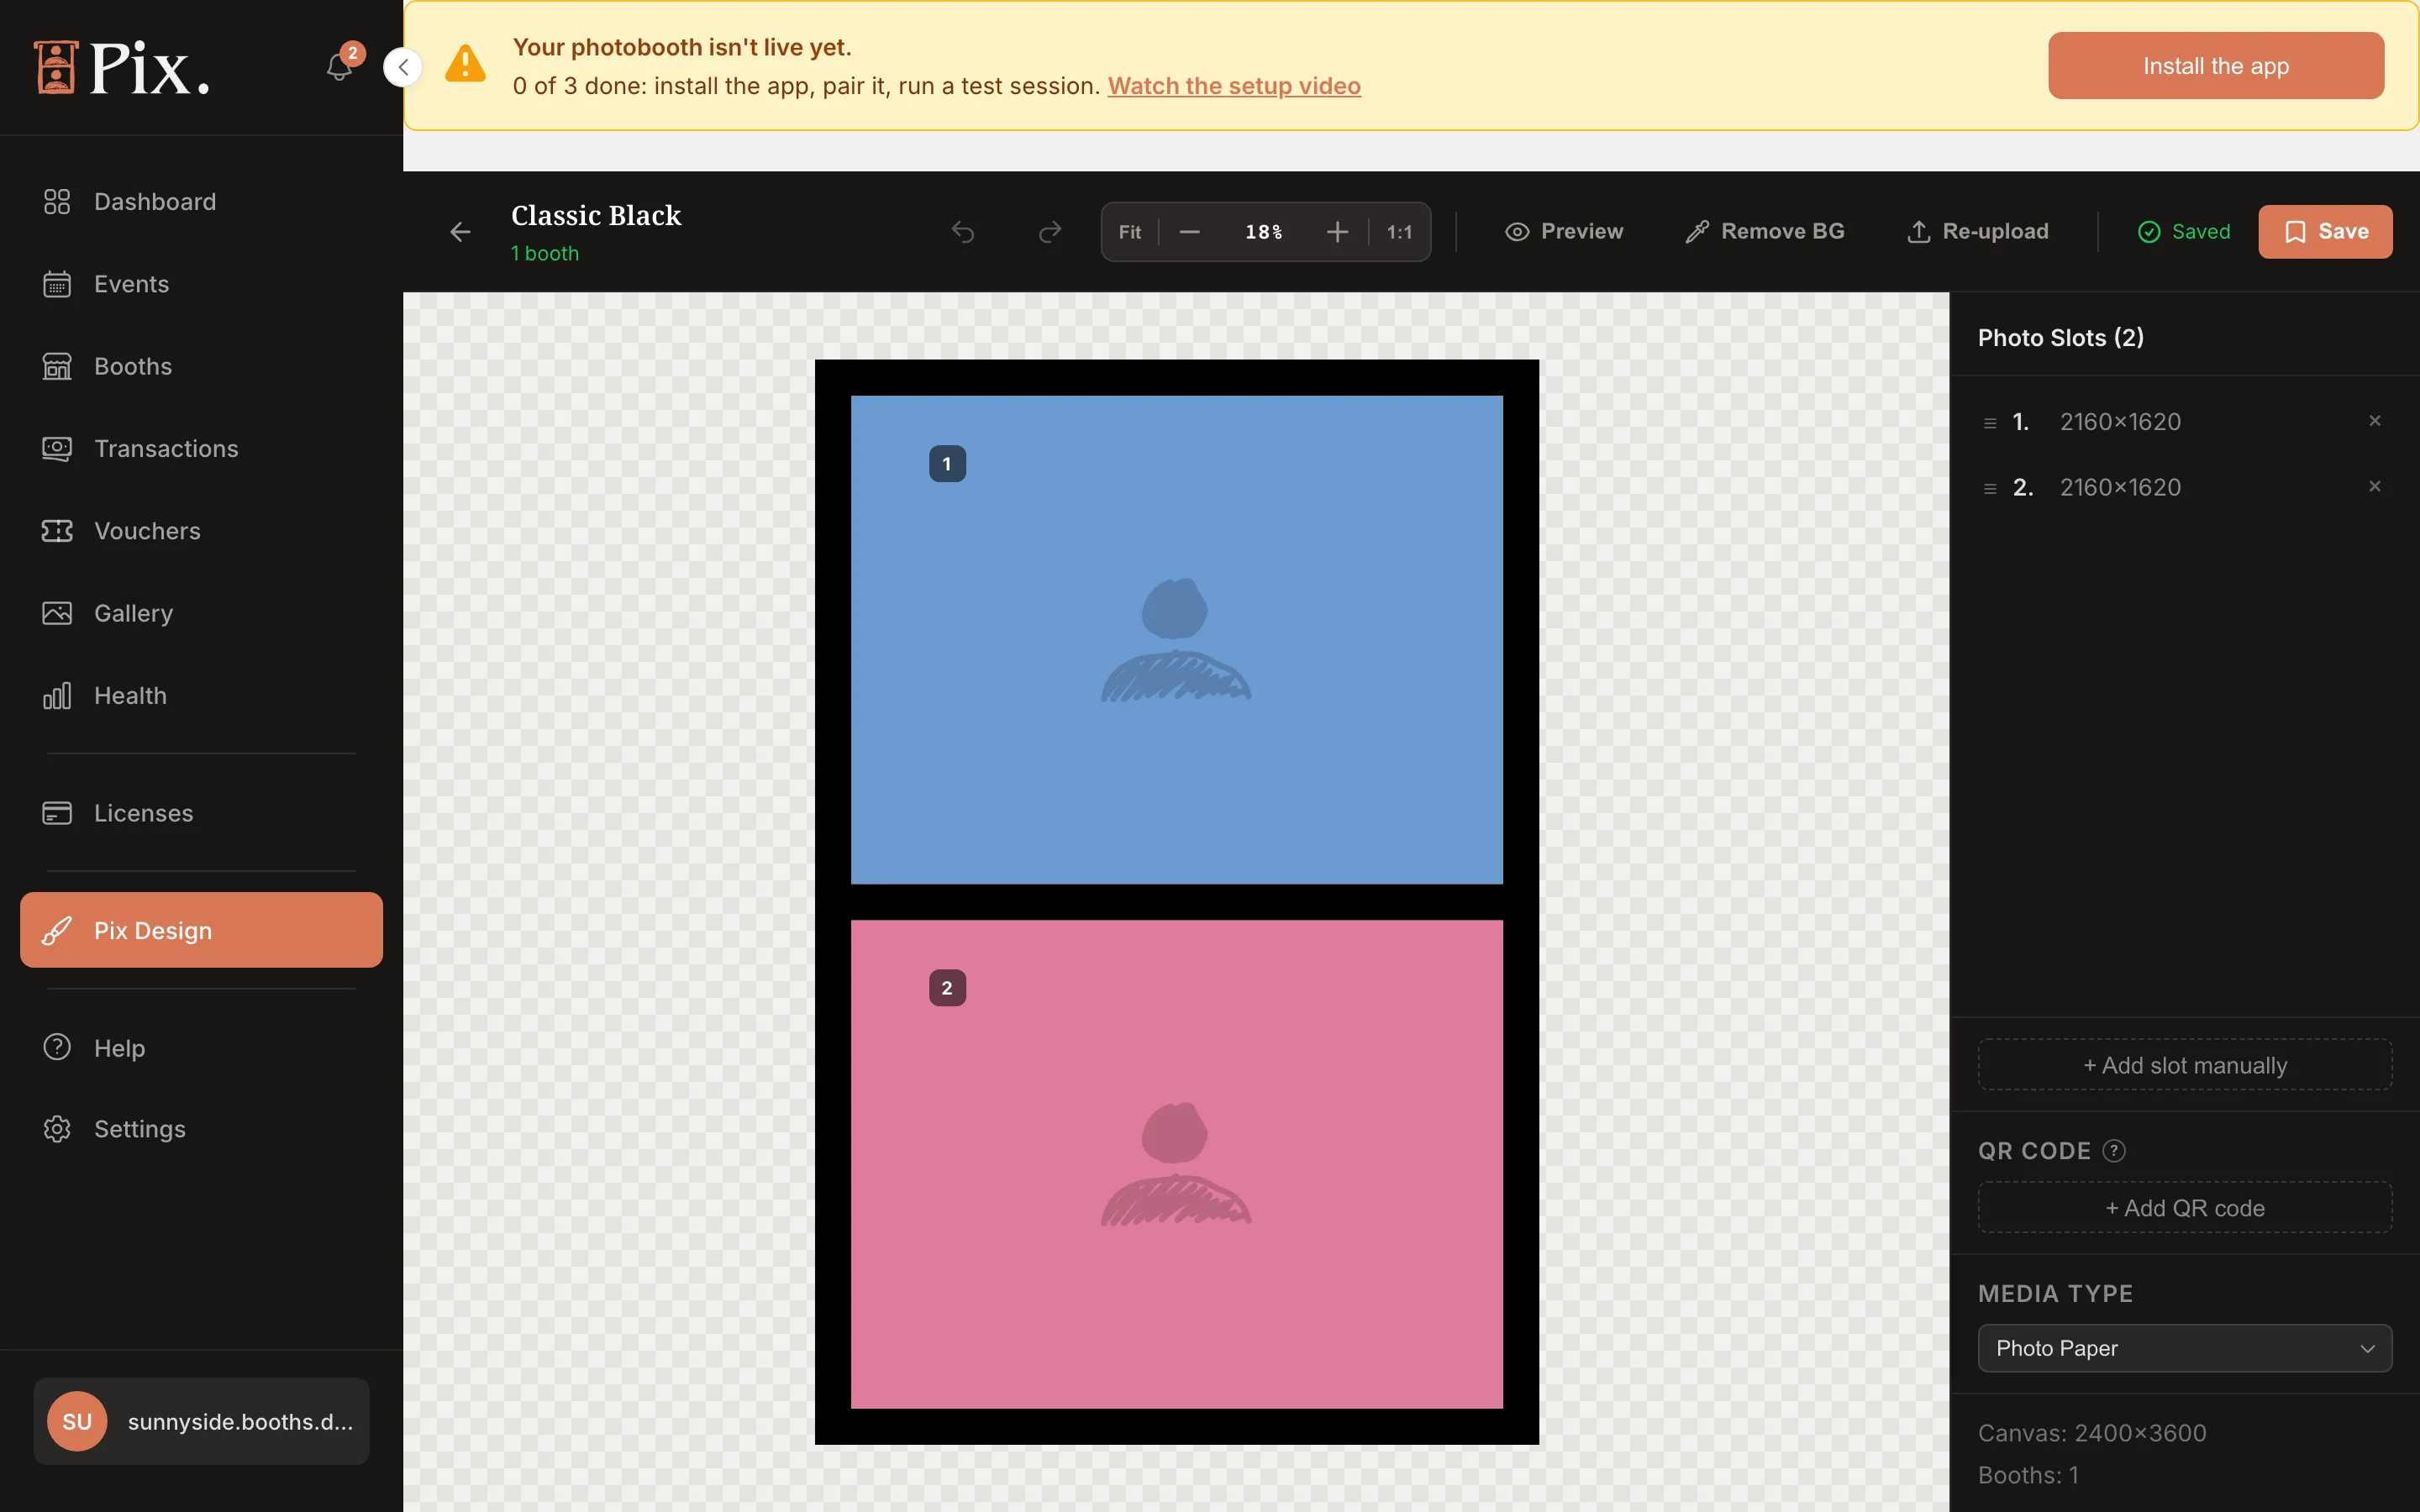
- The toolbar has Undo, Redo, zoom, Preview (the layout with sample photos), Remove BG, Re-upload (swap the artwork and keep the project) and Save.
- The side panel lists Photo Slots (n), detected from the transparent areas. Use Add slot manually for a slot the detection missed, or for a slot over an opaque area.
- Add QR code places a QR block on the print. The booth fills it with the guest's share link, so a printed strip leads back to the digital copies.
- Media Type can be changed here as well.
- The canvas shows white under the artwork, because the booth prints on white. If the artwork takes a while to arrive, a Loading artwork... bar shows the progress; if it stalls, click Retry.
Remove Background
Remove BG makes a colour in your artwork transparent, so the photos show through it. Use it on a JPG, or on a PNG exported with white or coloured boxes where the photos go.
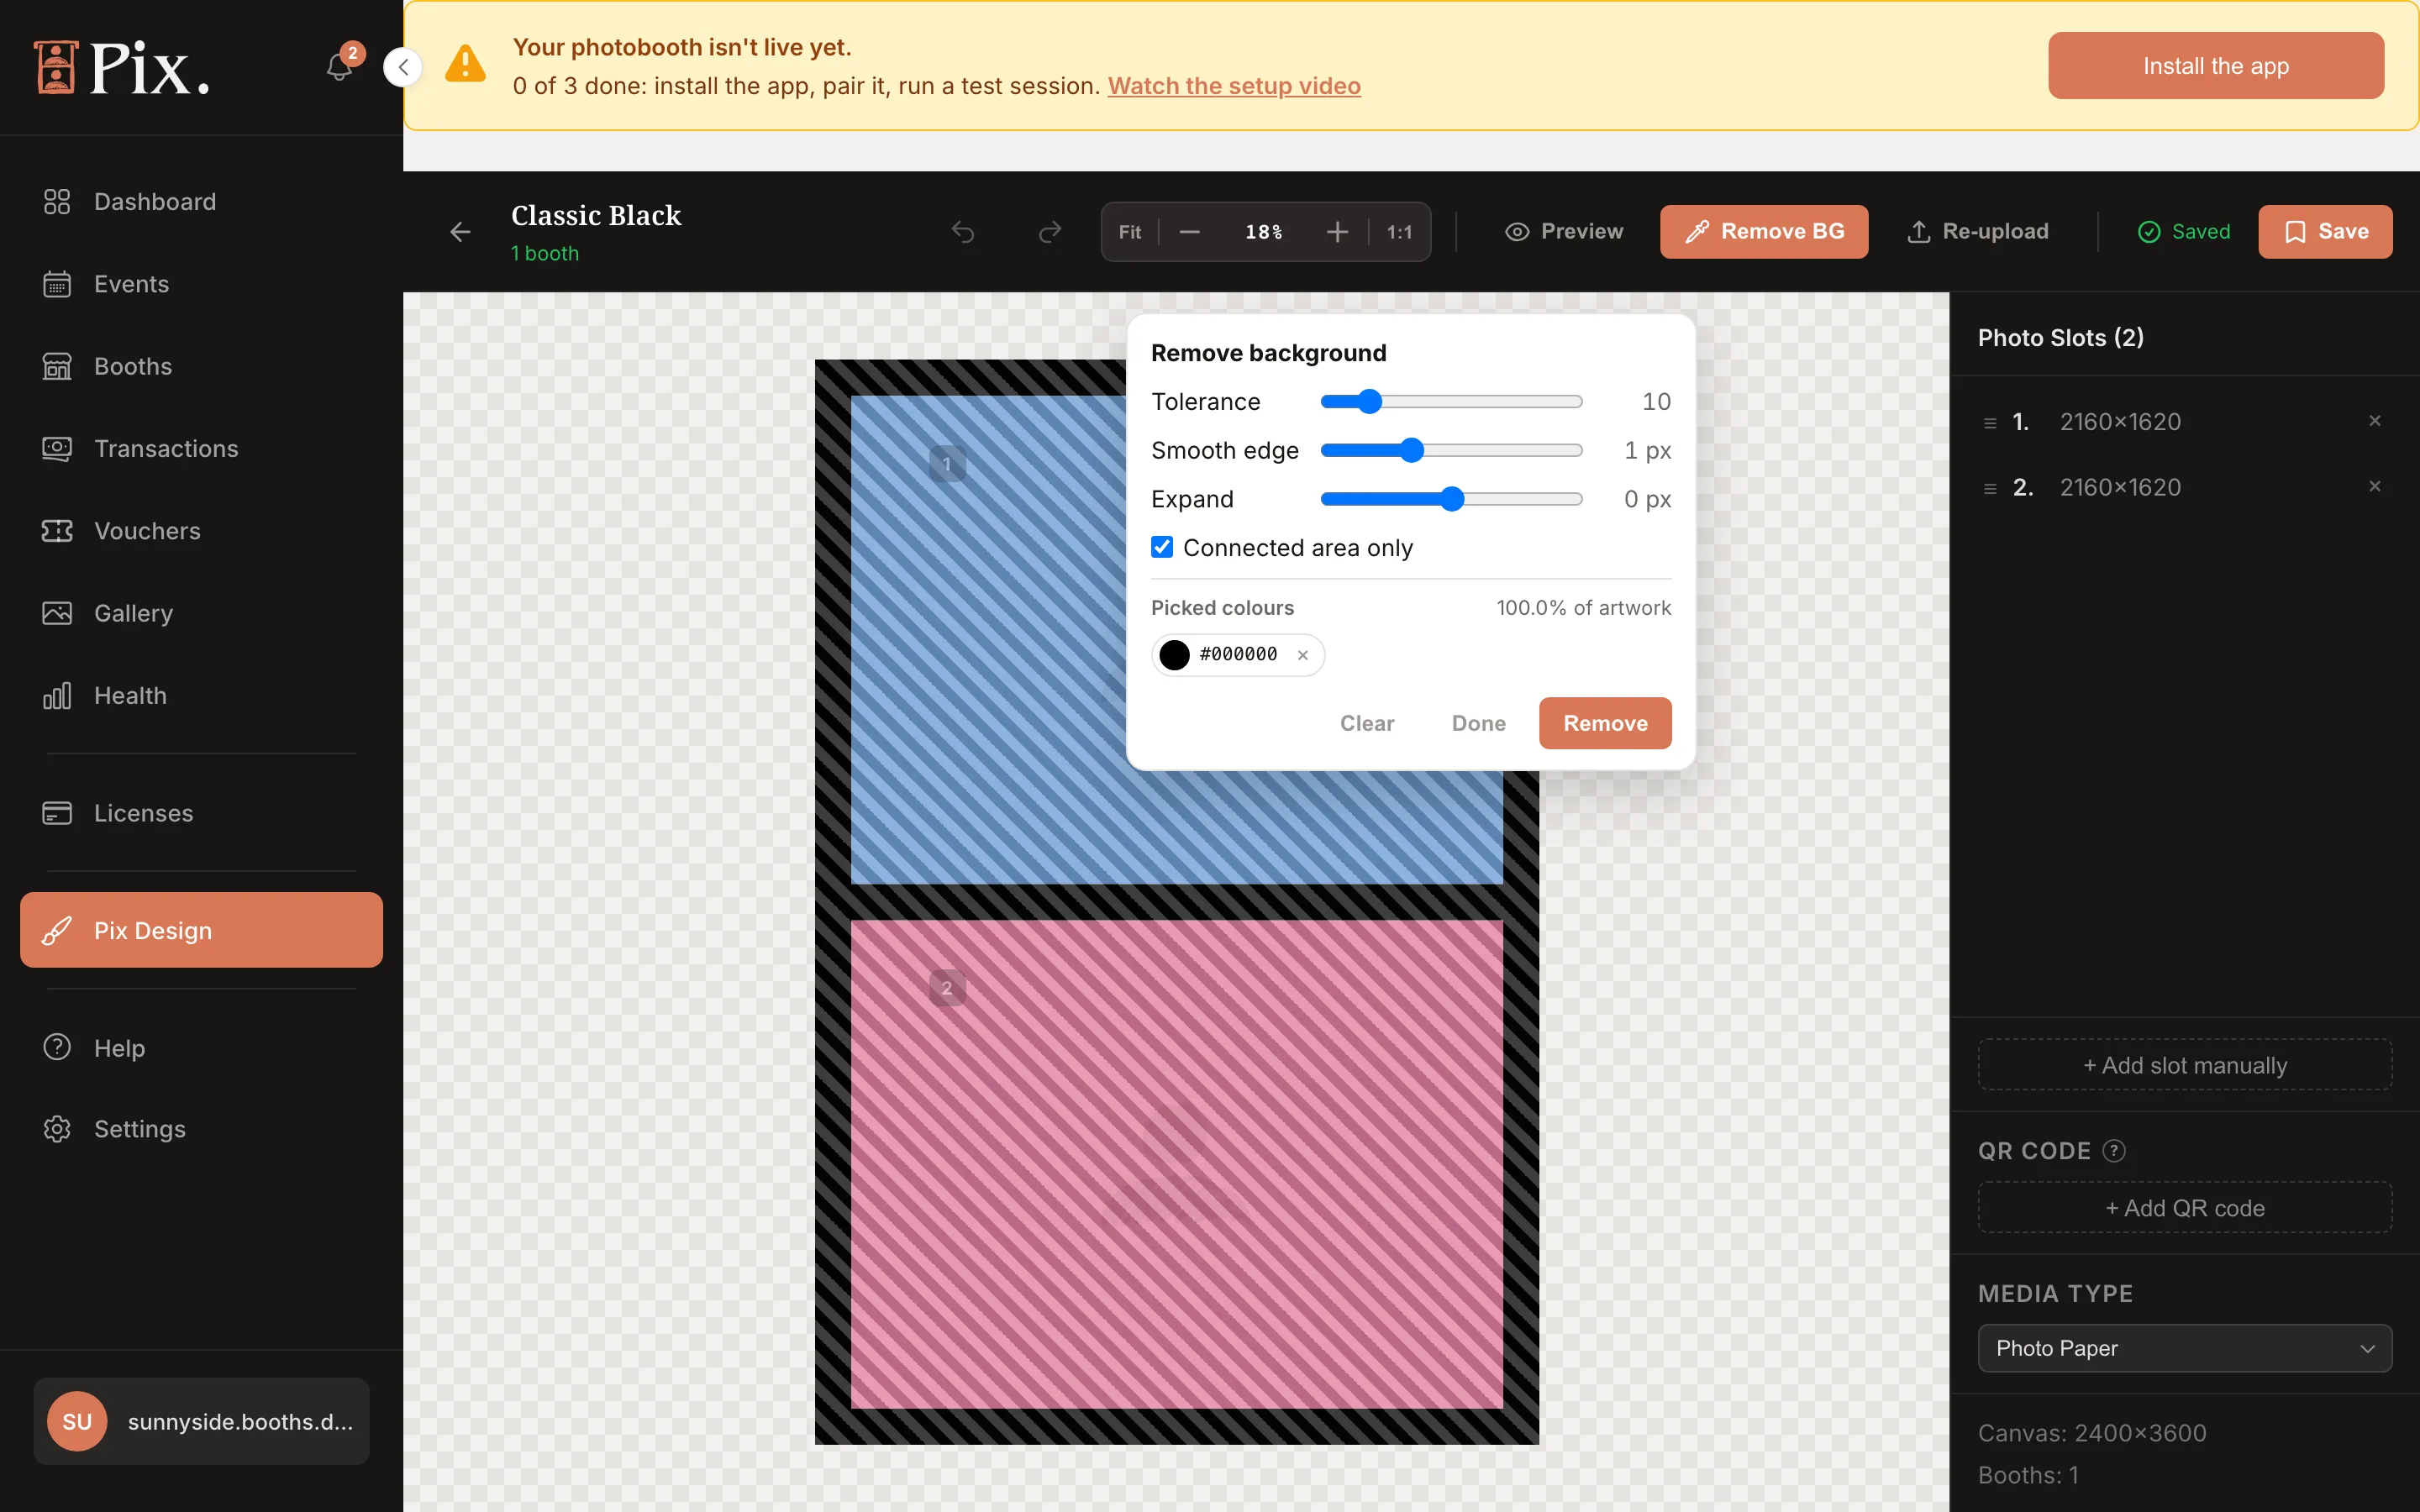
- Click Remove BG. The cursor becomes an eyedropper.
- Click the colour to remove. The area it selects is hatched with a moving outline, and the colour appears under Picked colours with its hex code and how much of the artwork is selected.
- Hold Shift and click to add another colour, or Alt (Option on a Mac) and click to take an area out. The x on a picked colour drops just that pick.
- Adjust the selection if needed:
- Tolerance (1 to 60, default 10) sets how close a colour must be to the one you clicked.
- Connected area only keeps the selection to the area around your click; untick it to take the same colour everywhere on the artwork.
- Expand grows or shrinks the selection by a few pixels.
- Smooth edge softens the cut by 0 to 3 px, so no hard white fringe is left around the photo.
- Click Remove (or press Enter). The editor makes the area transparent, saves the new artwork and adds a photo slot for each new transparent area. Clear starts the selection over, Done closes the tool.
One Undo reverts a removal together with the slots it added. Running Remove BG again never adds a second slot over an area your slots already cover.
Photo Slot Options
Select one slot to see its extra rows in the side panel:
- Cut out artwork appears when a slot sits over part of your design. With it ticked, the editor clears that rectangle from the artwork when you save, so the photo shows. A slot you draw over artwork is ticked by default.
- Copy of makes the slot repeat another slot's photo, so the guest takes fewer photos than the template has slots, for example a strip with the same photo printed twice.
- Layer buttons appear when slots overlap: Send to back, Send backward, Bring forward and Bring to front, with a "Layer 2/3" readout. Slot numbers, and so the order photos are taken in, never change.
Selecting and Moving Slots
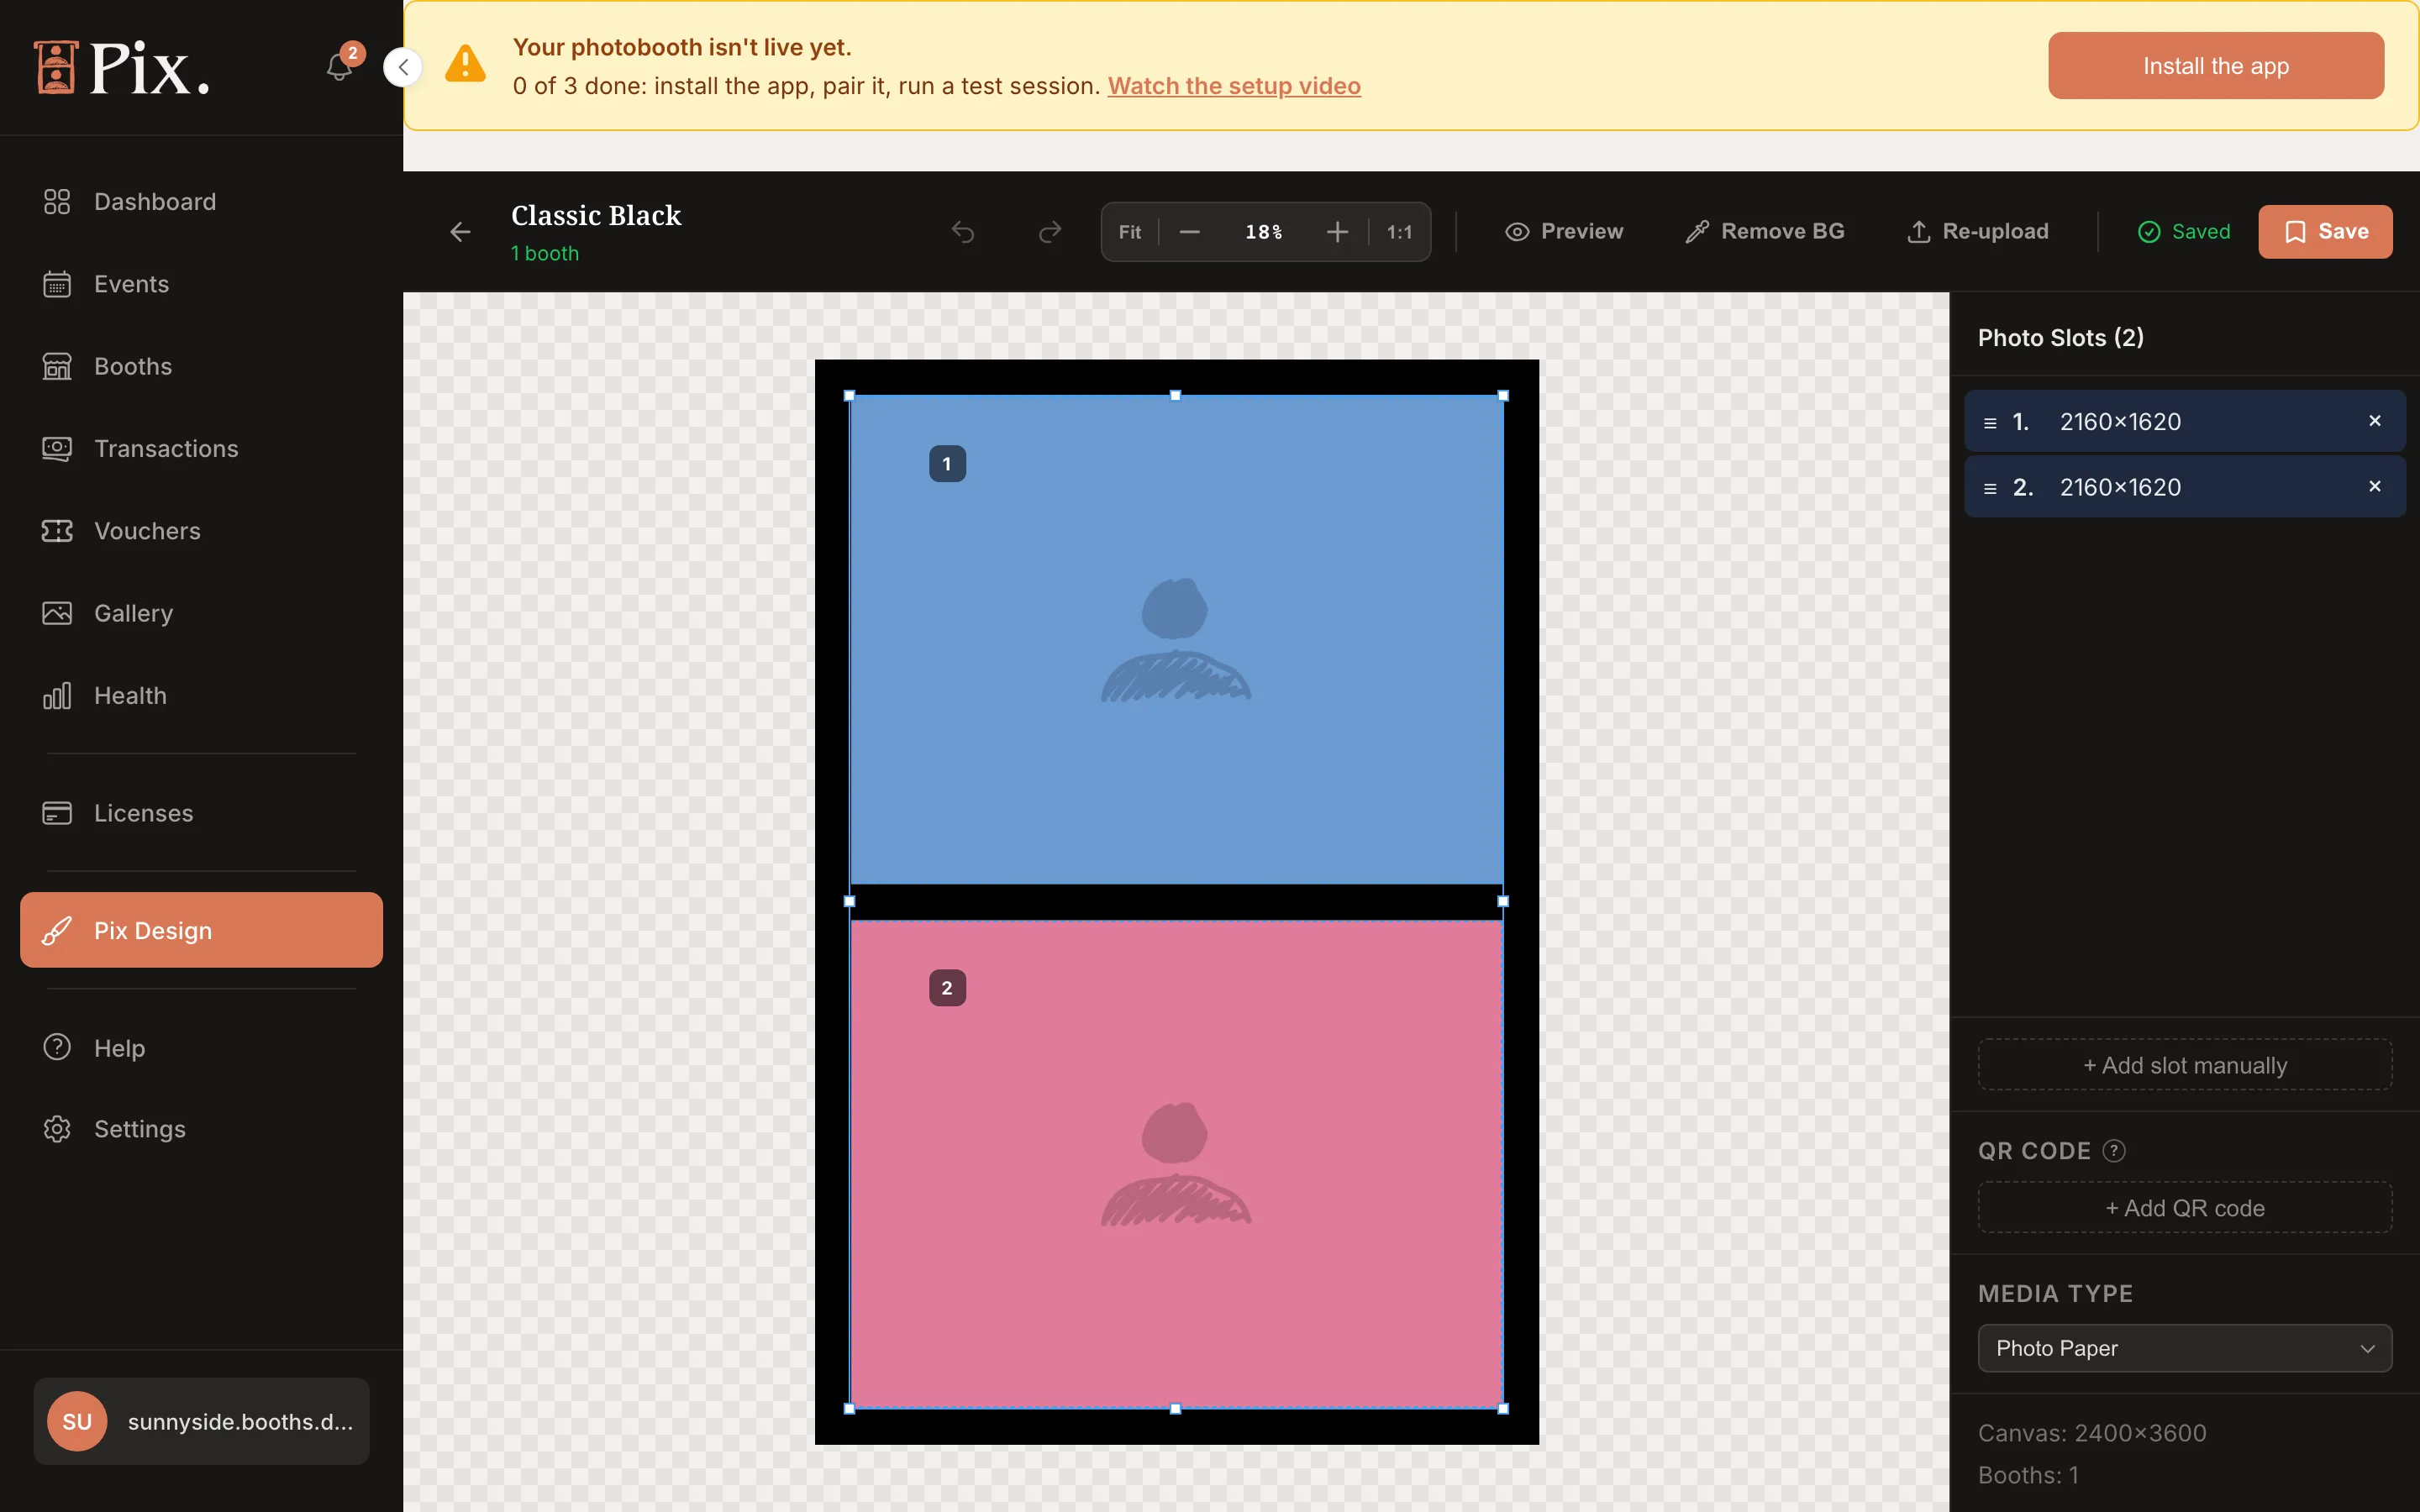
- Drag on an empty part of the canvas to draw a selection box; every slot it touches is selected. Shift or Cmd/Ctrl-click a slot, on the canvas or in the side panel, to add or remove it.
- A group gets one box with eight handles. Drag any slot to move the group, drag a handle to resize it, and hold Shift on a corner to scale it evenly.
- While you drag or resize, slots snap to the canvas edges and centre, to other slots and to the QR code. Hold Alt (Option) to place freely.
| Shortcut (Mac / Windows) | Does |
|---|---|
| Cmd+A / Ctrl+A | Select all slots |
| Cmd+C, Cmd+V / Ctrl+C, Ctrl+V | Copy and paste the selection |
| Cmd+D / Ctrl+D | Duplicate the selection |
| Arrow keys | Nudge 1 px (Shift: 10 px) |
| Delete or Backspace | Delete the selected slots |
| Cmd+[ and Cmd+] / Ctrl+[ and Ctrl+] | Send backward, bring forward (add Shift for back and front) |
| Cmd+Z, Cmd+Shift+Z / Ctrl+Z, Ctrl+Shift+Z | Undo, redo |
| Esc | Clear the selection |
On the first Save the editor asks you to Name Your Template and offers Assign to booths right away. You can also assign later; see Assigning Templates.
Tips
- Slot order is capture order. Slot 1 gets the first photo. Check the numbering under Photo Slots before you save.
- Prints per sheet is a pricing setting. With 2" Cut or Triple Strip media, set Print format on the booth's Pricing tab so the booth shows the guest the right number of prints. It changes what is shown, not what is printed.
- Many PNGs at once? Settings > Data > Import Templates takes a ZIP of up to 50 PNGs at one print size.
- Categories on templates become buttons on the booth's Templates screen. See Folders and Categories.
The booth shows each template card using the thumbnail rendered by this editor, so what you see in Preview is what guests pick from.