Sell AI Portraits From the Share Page (Beta)
In this tutorial you will buy Pix AI credits, put AI presets on a booth, set a portrait price and make your first sale from a guest's share page. It takes about 20 minutes.
Pix AI, the AI portrait shop and AI credits are available to beta accounts. If you do not see Pix AI (Beta) on Pix Design, ask Pixture through the Help button to turn it on for your account.
What the Guest Sees
- After a photo session, the guest opens their share page and finds a banner above their photos: "One shot, a new look".
- The banner opens the shop page. The guest picks one of their photos and one look, taps Generate, chooses digital or digital + print when the booth offers a print, and pays through your payment gateway (QRIS in Indonesia, card elsewhere).
- The portrait is generated, usually within a minute, and appears on the guest's share page under "Your AI portrait is ready".
- With a print, the guest also gets a 7-character pickup code. They walk to the booth, start a session, tap Voucher on the Payment screen and type the code. The booth shows "Printing your portrait. Take it from the tray.", prints the portrait and returns to the Start screen after a few seconds. Each code prints once.
Before You Start
- A beta account with Pix AI turned on.
- Pix Pro on the booth's computer, with Singles Upload ON under Booths > [booth] > Settings > Output Settings. The shop works from the guest's single photos.
- A payment gateway that charges in the booth's currency (Settings > Payment Gateway).
- Pix Desktop App 1.1.110 or newer on the booth if you want to offer prints.
Step 1: Buy AI Credits
-
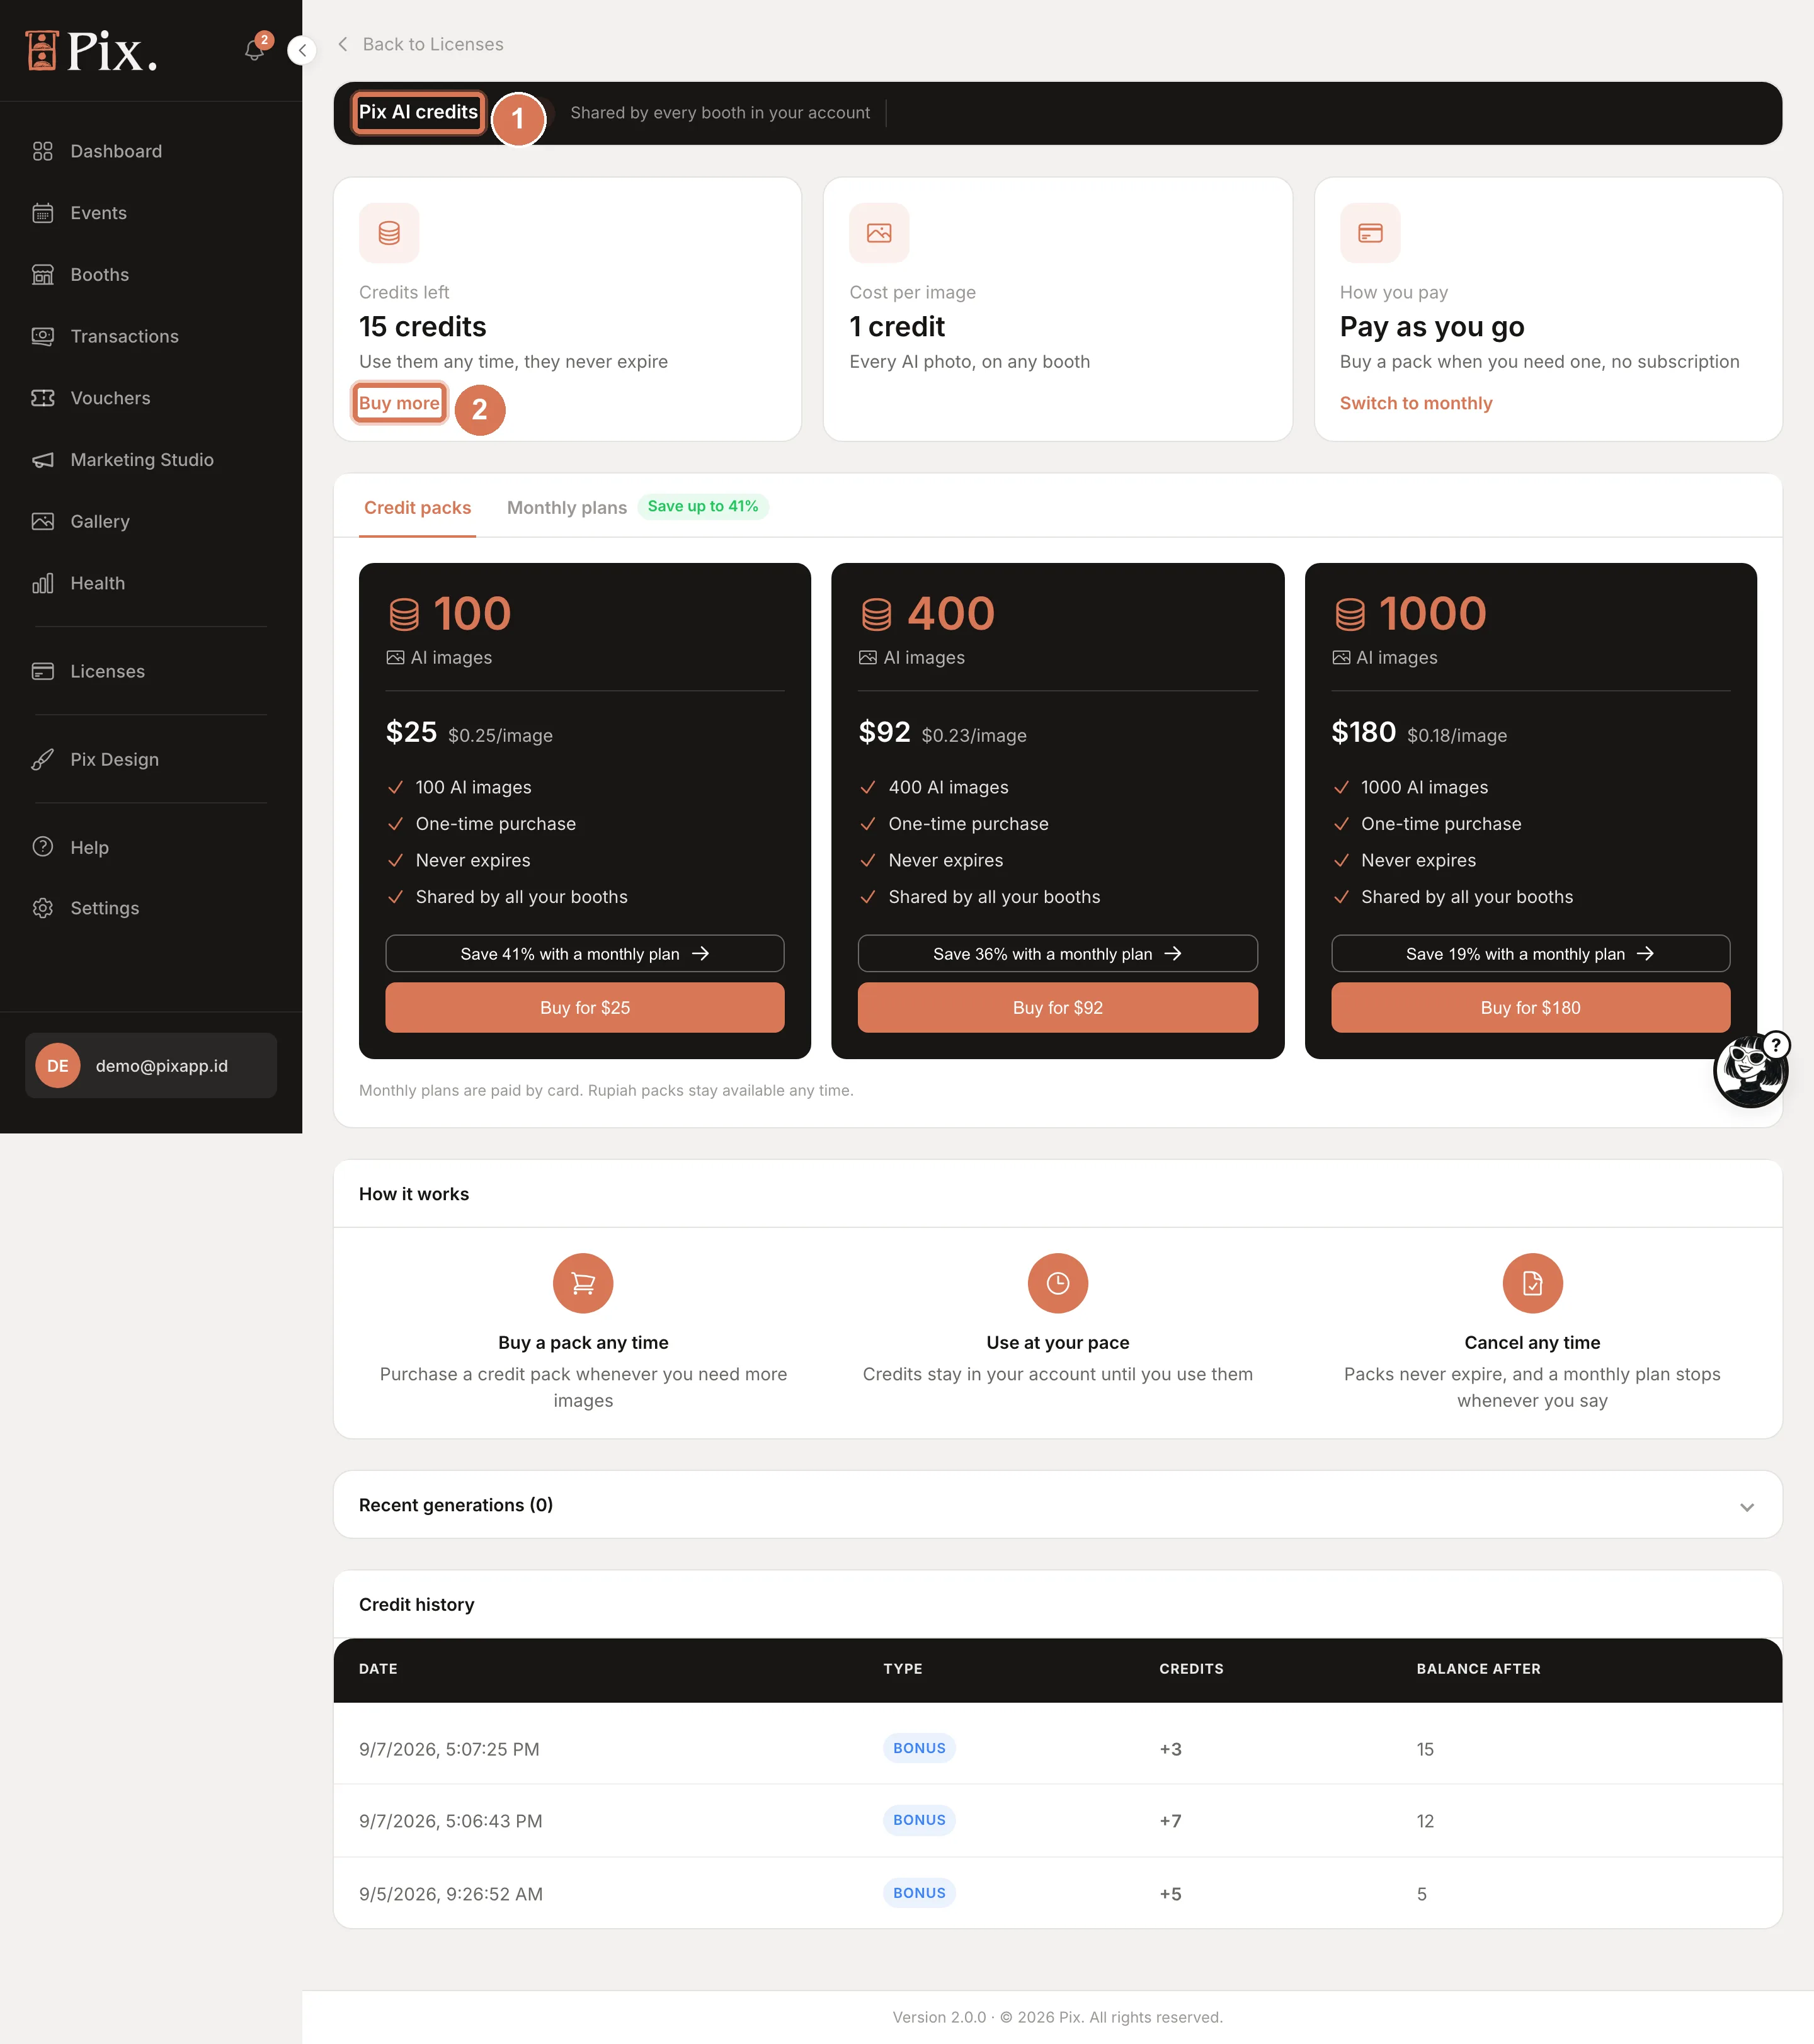
Open Devices and click Manage credits on the Pix AI credits card. The page shows your credits left, the cost per image (1 credit per portrait) and how you pay.
-
Click Buy more and pick a pack of 100, 400 or 1000 credits, priced in rupiah in Indonesia and in dollars everywhere else, or choose a monthly plan whose credits reset each month. Credits are shared by every booth in your organization.
Step 2: Put Presets on the Booth
-
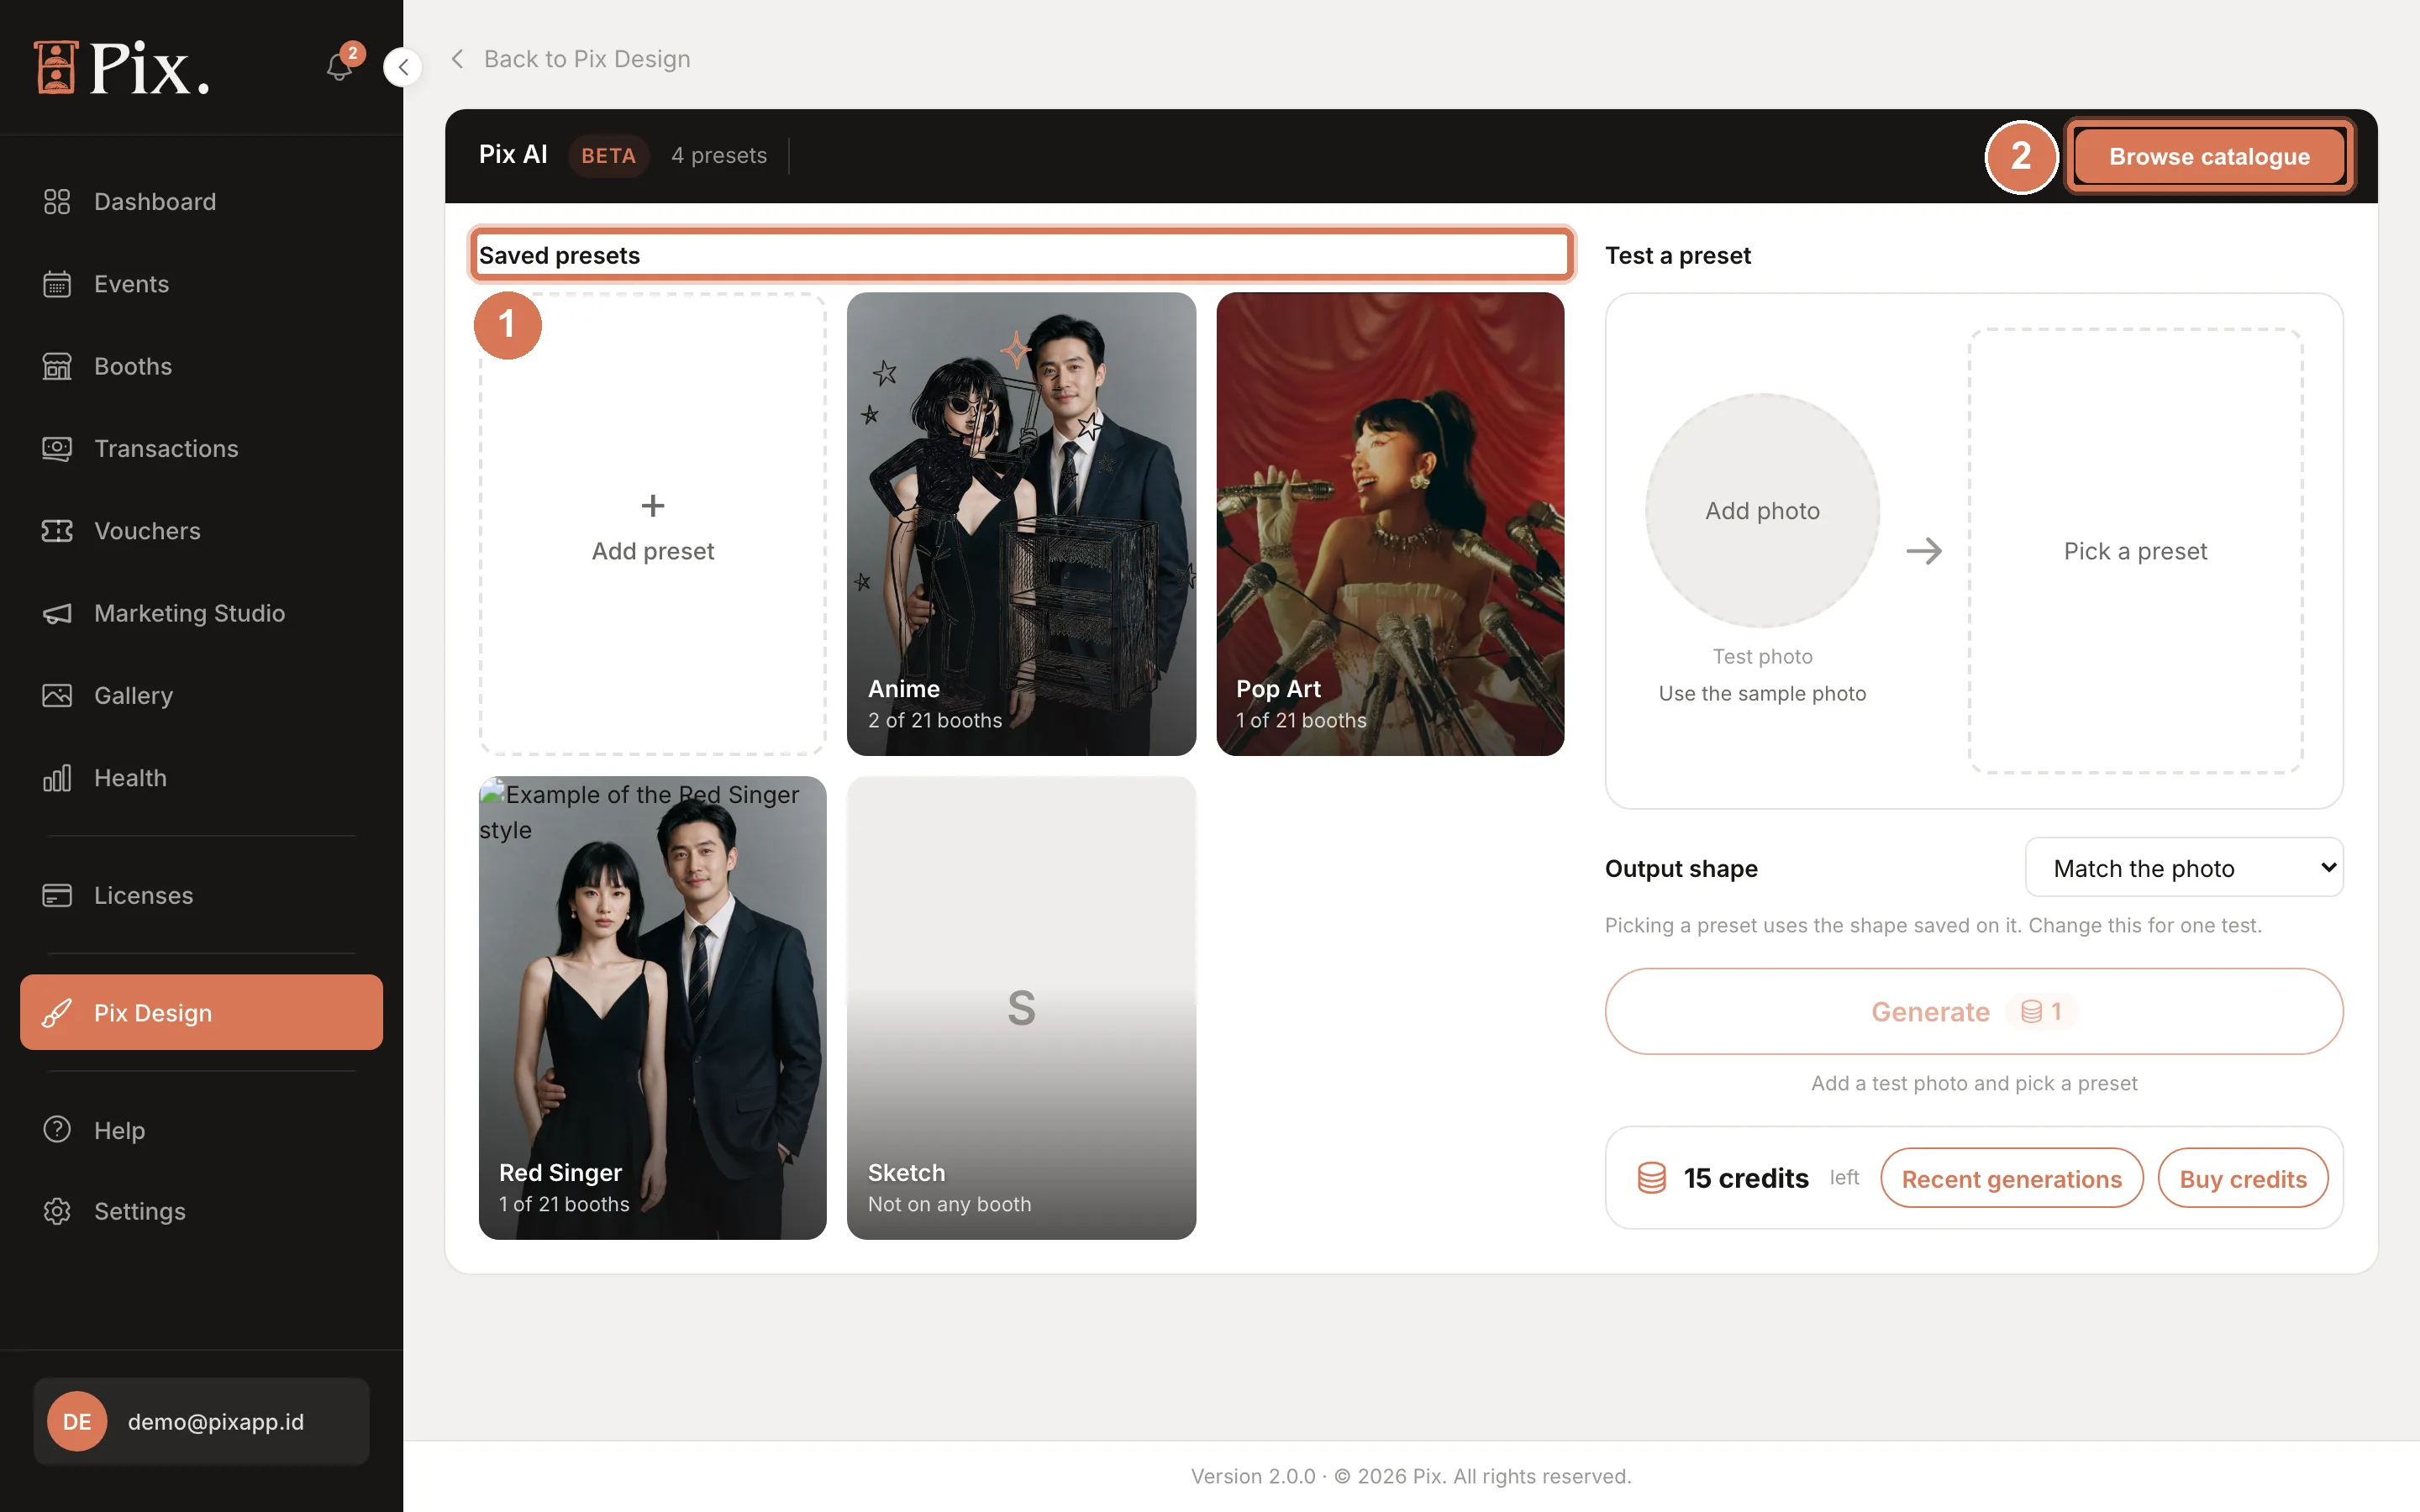
Go to Pix Design > Pix AI. The page has your Saved presets, a Browse catalogue button (it opens the Browse AI presets window), a Test a preset panel and Recent generations.
-
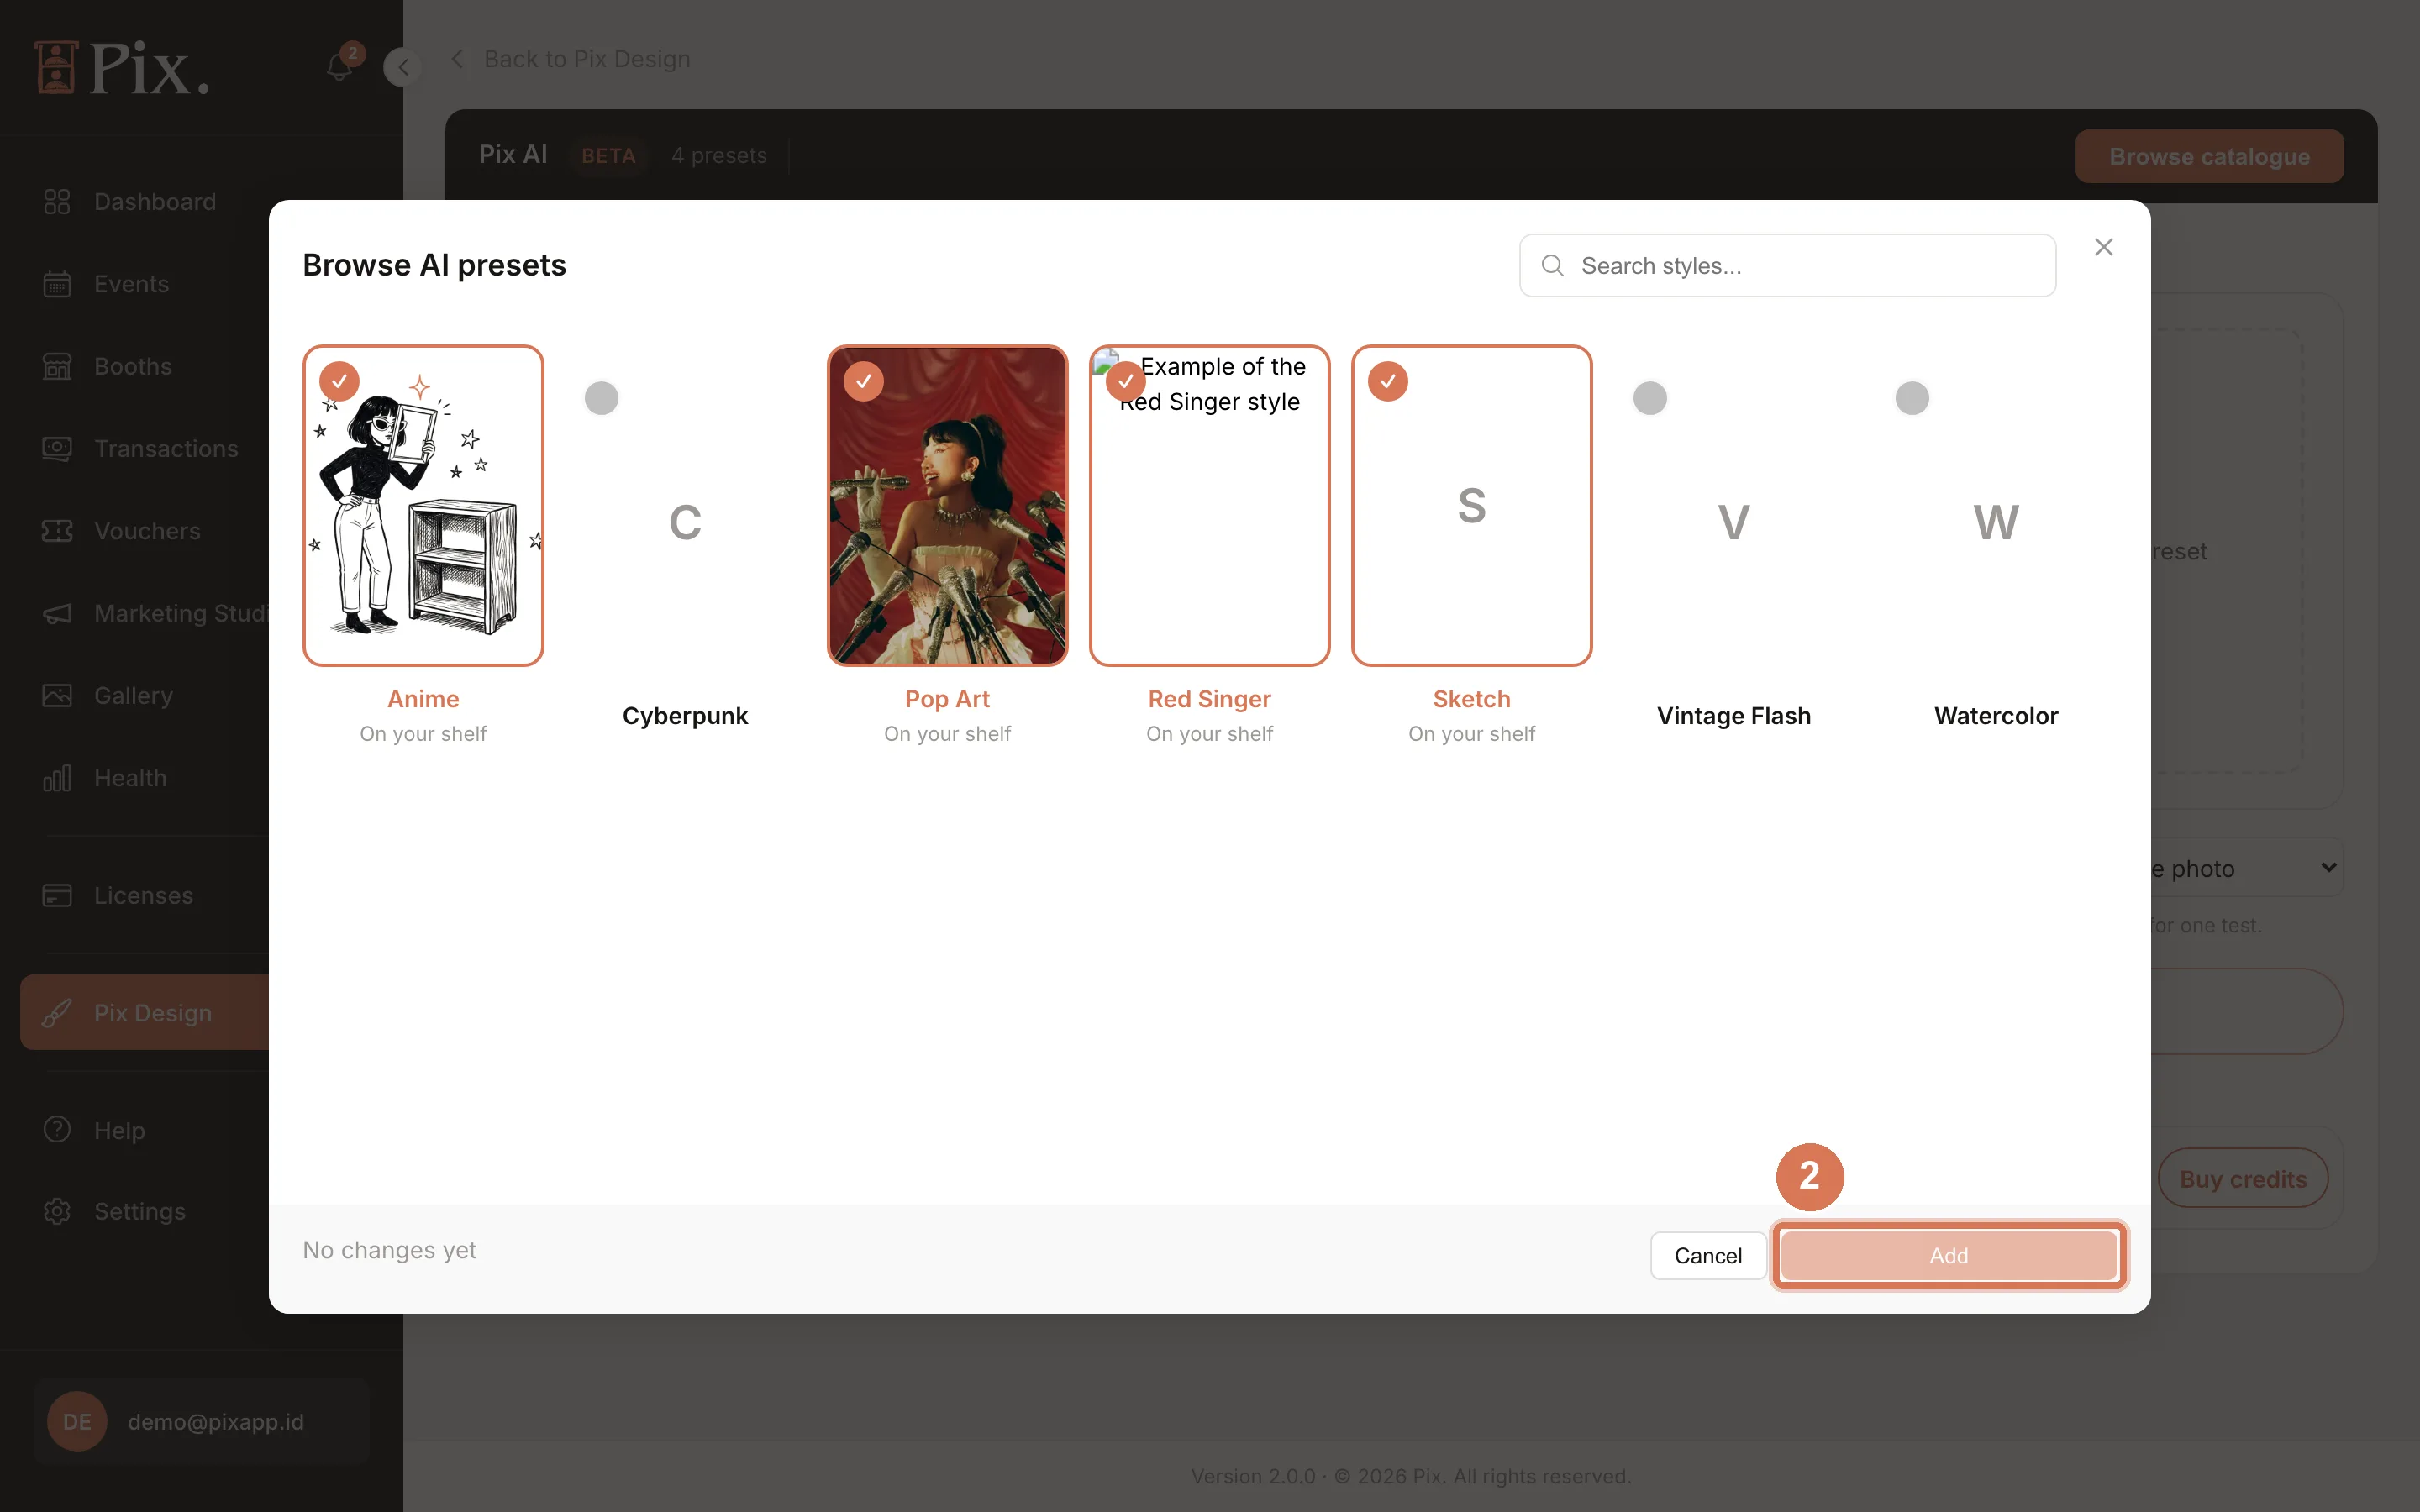
Click Browse catalogue, tick the looks you want to sell and click Add.
-
On each saved preset, assign the booths that may sell it (or all booths). Only presets assigned to a booth appear in that booth's shop.
-
Try a look before selling it: in Test a preset, add a photo or use the sample photo, pick the preset and click Generate. A test costs 1 credit.
Step 3: Set the Price on the Booth
-
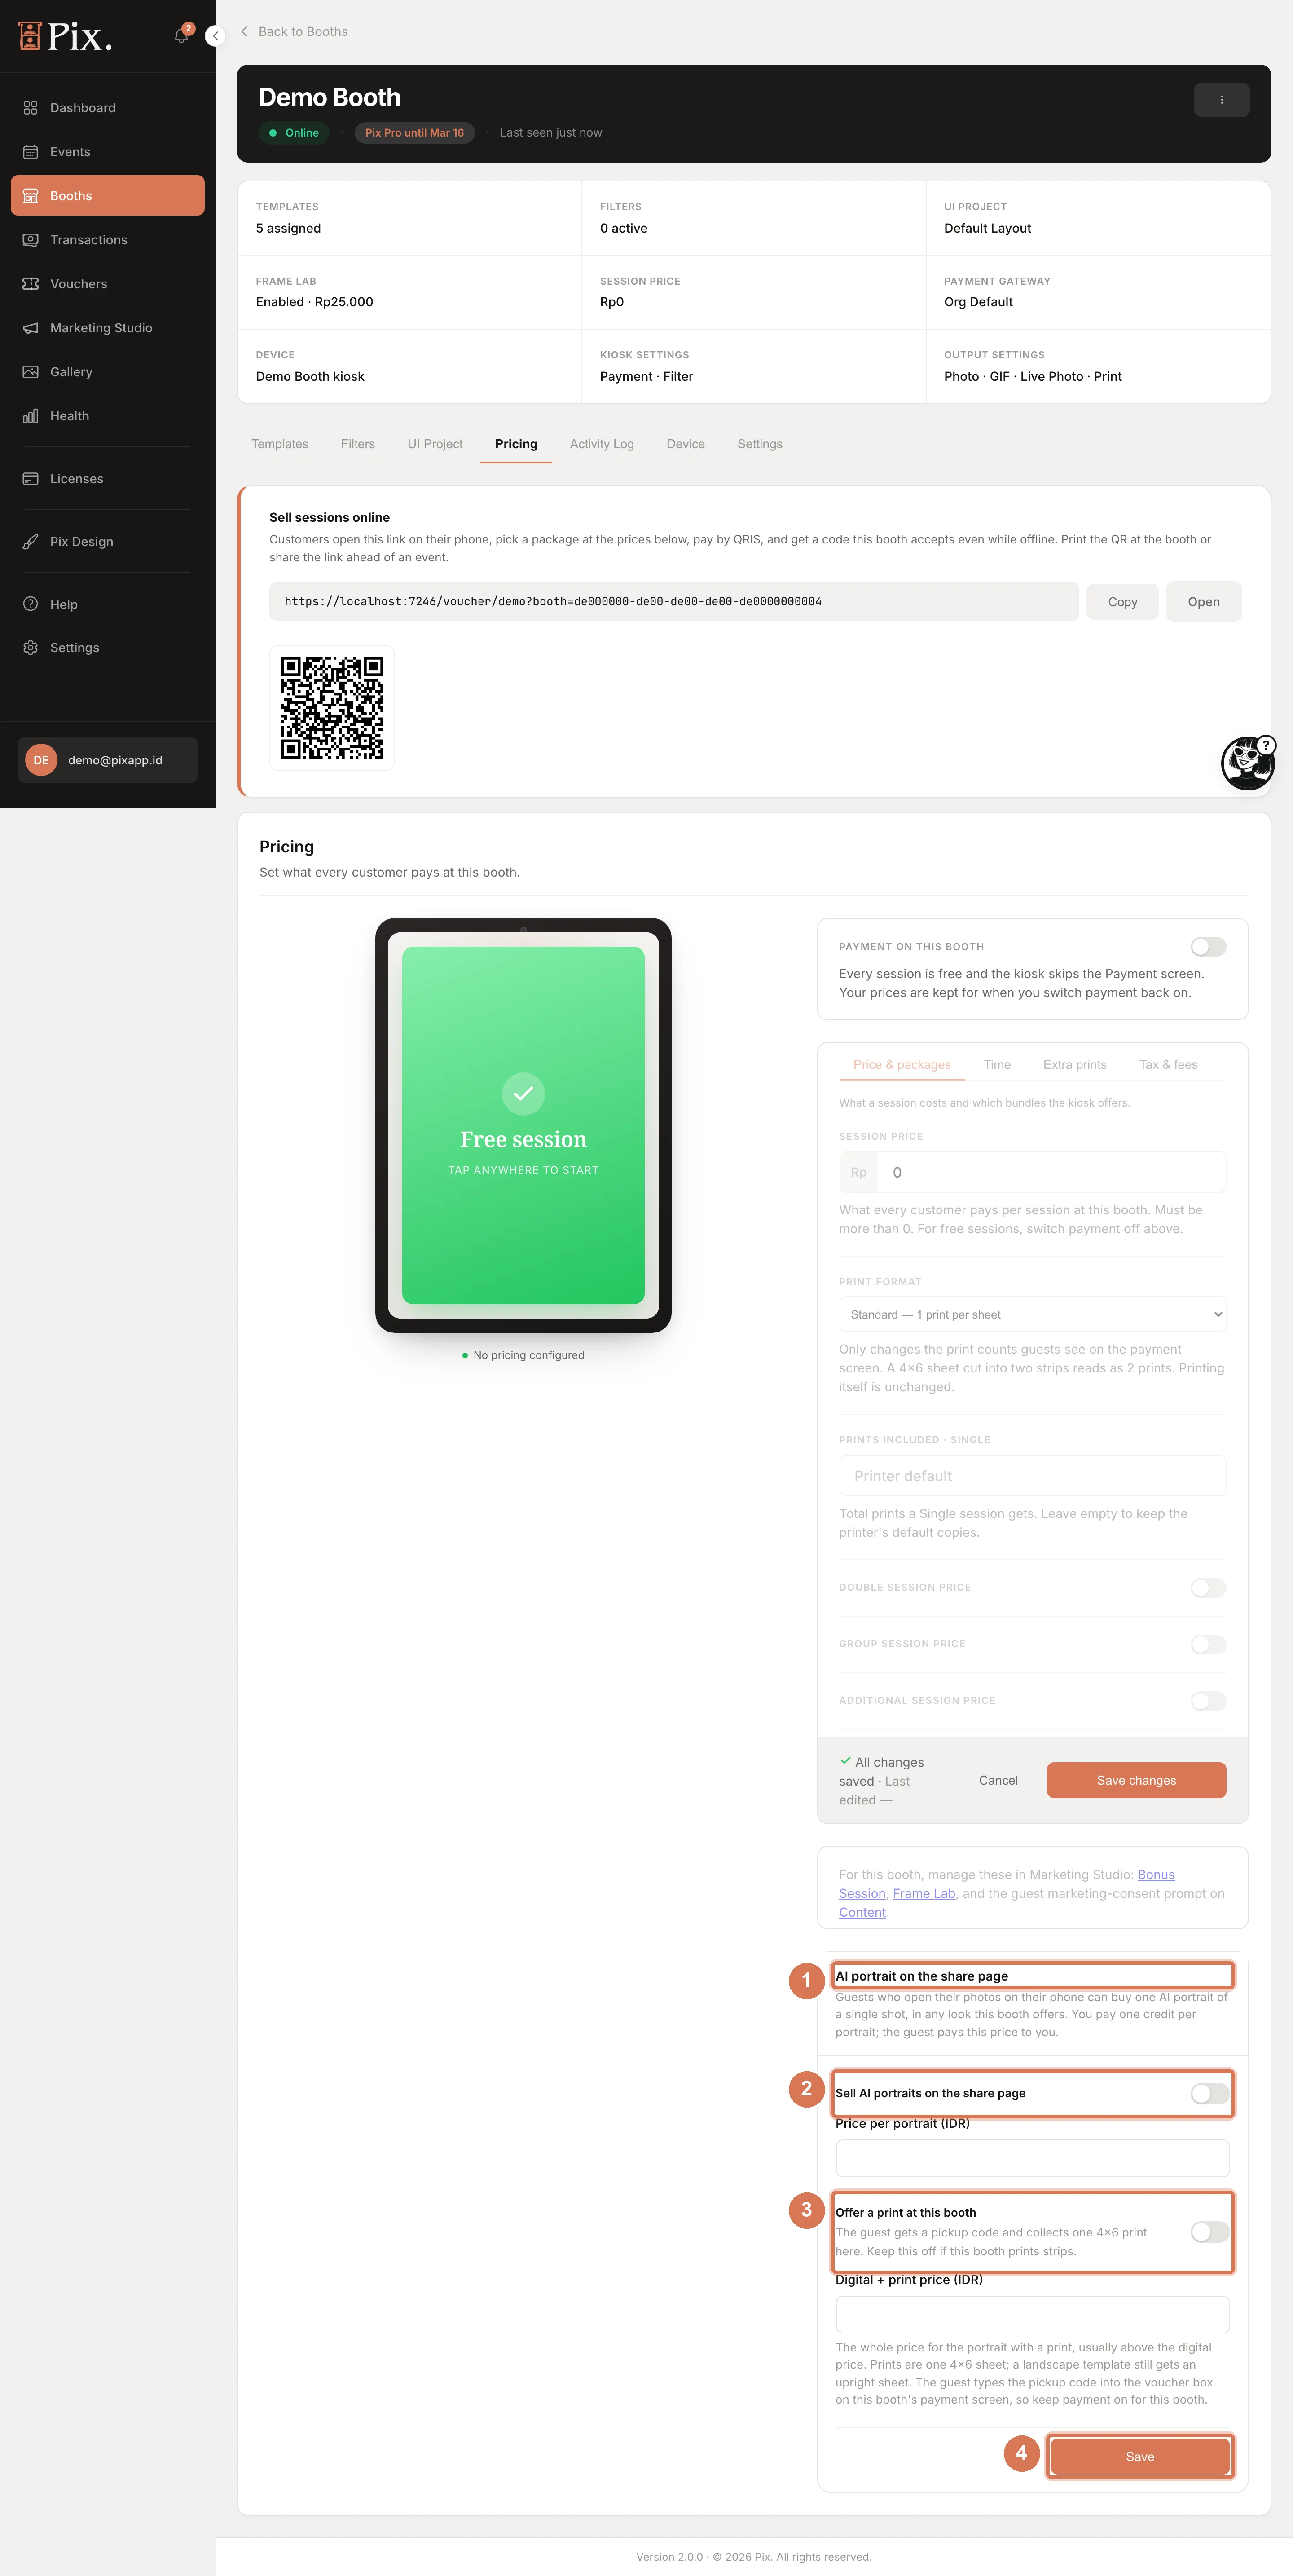
Open Booths, click Configure on the booth, then the Pricing tab and scroll to the bottom. Beta accounts see a card called AI portrait on the share page under the pricing sub-tabs.
-
Turn on Sell AI portraits on the share page and enter the Price per portrait.
-
To sell prints, turn on Offer a print at this booth and enter the Digital + print price (what the guest pays for the portrait and the print together).
-
Click Save on the card.
Step 4: Check the Gateway and the Payment Switch
- On the booth's Settings tab, check the booth's Currency and the Active Gateway. The gateway that serves this booth must be able to charge in that currency, or the shop cannot take payment.
- Keep Payment on this booth ON at the top of the Pricing tab. Pickup codes are typed into the Payment screen's voucher box, so a booth with payment switched off cannot hand out prints.
Step 5: Try It as a Guest
- Run a session on the booth and scan the share QR with your phone. The banner sits above the photos.
- Pick a photo and a look, tap Generate, pay, and wait while the page says "Warming up" and "Almost there". The portrait appears on your share page.
- If you chose a print, take the pickup code to the booth, start a session, tap Voucher on the Payment screen and type it. The booth prints the portrait and returns to Start.
Where Sales Show
- Transactions lists each sale as a row labelled AI portrait or AI portrait + print, counted in Total Revenue and in the Excel export. These rows are not tied to a photo session.
- The Dashboard revenue card includes them.
- Pix Design > Pix AI lists the recent generations, and the Pix AI credits card on Devices shows the credits left.
Check It Worked
- The share page of a fresh session shows the "One shot, a new look" banner.
- A test purchase delivers a portrait to the share page and appears on Transactions as AI portrait.
- One credit less on the Pix AI credits card.
Troubleshooting
| What you see | What to check |
|---|---|
| No banner on the share page | One of the pieces is missing: Pix AI not turned on for the account, no credits left, no preset assigned to that booth, the Pricing card switch off or without a price, no gateway for the booth's currency, or Singles Upload off so the session has no single photos. |
| The shop offers digital only | Offer a print at this booth is off, or the booth is offline. Prints are offered only while the booth has checked in during the last 12 minutes. |
| The booth refuses the pickup code | The code belongs to another booth, was already used, or the portrait is not ready yet. A booth with Payment on this booth OFF has no voucher box at all. |
| The guest paid but the portrait never arrived | Generation is retried; if it keeps failing, no credit is deducted and the payment needs a manual refund from your gateway. |